Alright, the first week of this crazy tournament has been played out, and we can already see some nice things happening!
Here are some statistics for the first round:
- TAKE-OUT LEADERBOARD
- Koen Vliegen
- Union
- 7 take-outs
- GOAL LEADERBOARD
- Illes Bock, Jan Stubben, Kim Rene Sjursaether, Marcus Lobar, Michiel Pillards, Pawel Korpal, Peter Keil, Tom Vananderoye
- 1 Alchemist, 1 Mason, 1 Hunter, 2 Navigators, 1 Shepherd, 1Blacksmith and 1 Engineer
- All on 3 goals
- RINGOUT LEADERBOARD
- Henry Kay
- Ratcatcher
- 2 ring-outs
- MASCOT KILL LEADERBOARD
- None yet
- MASCOT GOAL LEADERBOARD
- Aaron Wilson
- Brewer (Quaff)
- 1 goal
Besides my own game, I have also received battle reports from two other tables, and I’ve recorded the Table 1 game.
Table 1 – Jon Clough’s Engineers versus Johan Govers’ Union
This video report will come later on. I’m still figuring out how to edit, but when I get it done, expect loads of video reports in a short span of time. 😉
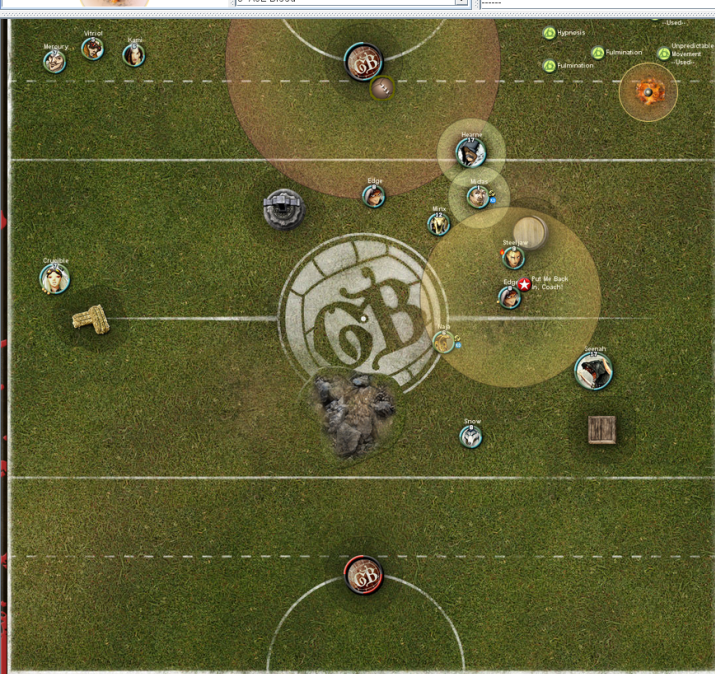
Table 14 – Alejandro Palmeyro’s Alchemists versus Sam Lillie’s Hunters
- Alchemists win the roll off and decide to kick
- Alchemists line-up
- Midas
- Naja
- Vitriol
- Mercury
- Kami
- Crucible
- Hunters line-up
- Steeljaw
- Snow
- Edge
- Veteran Minx
- Seenah
- Veteran Hearne
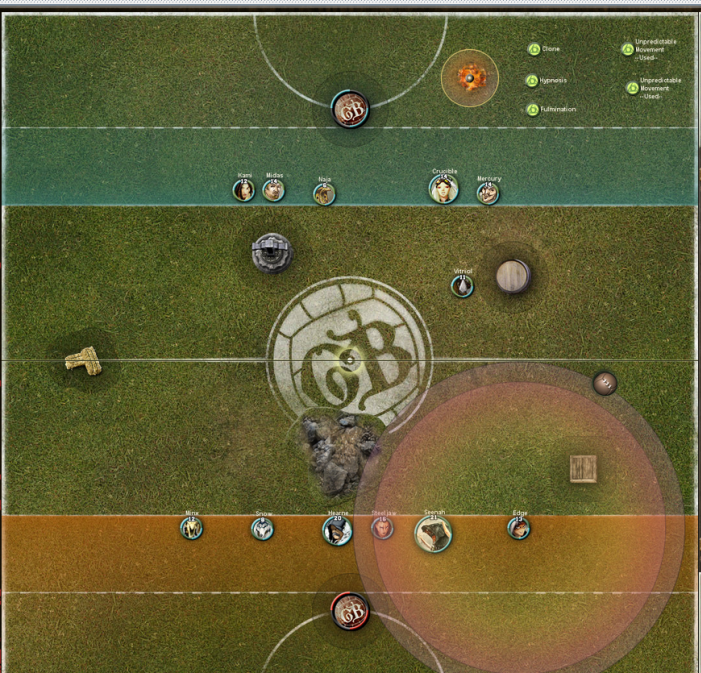
The Alchemists decide to kick from the top side of the pitch, with Vitriol as their elected kicking model. Sam decides to spread out and places Veteran Minx and Edge as his retrieval models, should the ball go towards the sides of the pitch. Alejandro indeed moves Vitriol towards the right side of the pitch, and the ball is scattered near the center line on the right side of the pitch.
This kick-off caused Edge to retrieve the ball, but had nowhere to pass it, so she kept the ball and stayed in some cover, provided by the wooden box obstruction and a trap marker between her and Vitriol. Alejandro wanted to set up Vitriol’s I’ve Been Burnt Before…, so he decided to throw a Fire Blast with Mercury and walk himself into it to receive the Burning condition.
Because there are no real damage threats on the Alchemists’ side, Sam thought it safe for Steeljaw to move up and Bait Vitriol towards her, putting some damage on the lass, but didn’t push her out of 4″ of Mercury. Knowing that Vitriol was now in danger of getting Seenah’d, Alejandro activated the lass and charged Steeljaw. After the charge and three attacks, she had push-dodged herself to safety and Steeljaw towards the rest of her team.
The action dies down with some setup activations, where Midas uses Lure of Gold to get Kami closer to the action, Naja moves forward, and Sam moves Veteran Minx, Snow and Seenah towards where the action is happening. When Alejandro then moves Crucible forward to put more pressure on Steeljaw, Veteran Hearne jogs over the rough ground terrain, getting a speed buff through Winter’s Blessing, and then Skewered‘s Crucible, teleporting over to her with Lunar Eclipse and pushed Crucible into melee with Steeljaw, while he was also engaging Vitriol. Lastly, Kami activates and puts some poke damage on Steeljaw, while also setting Edge and Seenah on fire through Deadeye and Chemical Ordnance. The Alchemists win the momentum race.
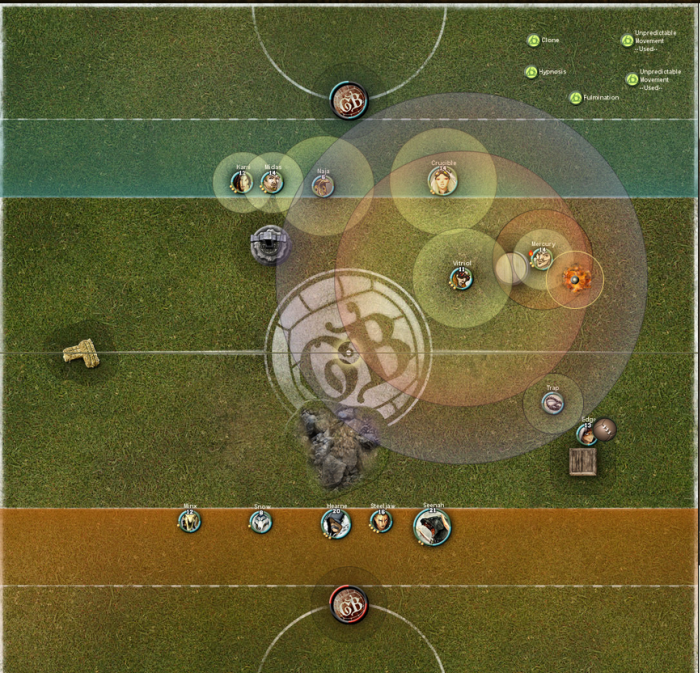
Alejandro decides to go for a very ballsy play here. He teleports to Edge to try and steal the ball away from her and score, but Edge, in cover and with Close Control, managed to keep the ball in that corner. In the end, Kami ends her turn with the ball, and besides Edge.
After this daring play went sideways, Sam was able to grab hold of the match, going into Crucible with Seenah and deleting her from the pitch, healing Steeljaw back to a more healthy 7 hit points, protected by the 2″ melee zones of the bear and Veteran Hearne. 2 points to the Hunters.
Midas decides to tag all but Veteran Minx and Snow with his Legendary Play at this point, but this only gives more momentum to Sam, as Veteran Hearne is now able to knock Vitriol down, who then needs to use Fulmination to dodge away from the fight, as Alejandro had no momentum to clear conditions. Veteran Minx provided Steeljaw with a Blessing of the Sun Father, which she uses to pull in Mercury into the scrum with Bait and some pushes, after which she shreds his armour through Weak Point and is able to knock him down. Alejandro saw that he had lost the fight, and moved into Veteran Minx, to try and start a new fight there.
Lastly, Edge retrieved the ball from Kami, dodged away, and was able to put Mercury onto 1 HP, while putting the Snared condition on all of the Alchemist models. The Hunters win the momentum race.
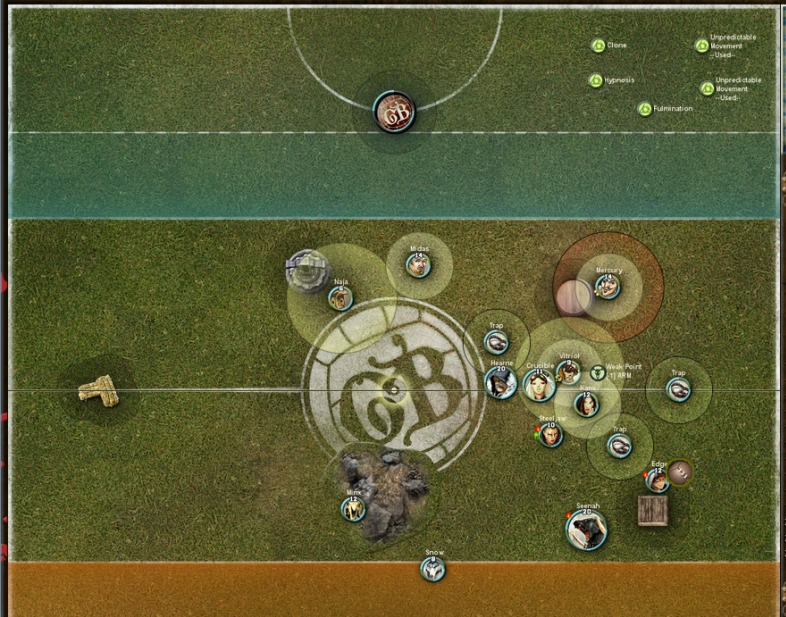
Turn three starts with Steeljaw taking out Mercury, and finishing off Vitriol with her Legendary Play, Bait and some attacks. (6-0)
Midas proceeds to charge Edge and knocks her down, most likely hoping for a nice scatter to get the ball with Where’d They Go? and punting the ball out towards Crucible to at least try and get some points on the board. Sadly, the ball goes towards Sam’s team and Midas is forced to just dodge away into safety of the cover by the barrel obstruction in the top right.
Seenah then retrieves the ball, drops it for Veteran Hearne, and proceeds to devour Kami to put Sam on 8 points and in control of the ball. The ball goes towards Edge, who banks in the shot for the win. (12-0)
I feel that Alejandro was a bit too tunnel visioned on the ball at the end of turn 1. Going for a 35% success chance play instead of trying to remove a 6-7 HP Steeljaw with a full stack feels a bit meh. From the screenshot, I’d say that Midas should’ve been able to get into there and maybe take her out, while also activate his legendary to spread conditions around on Hearne, Seenah and Edge, but with 2 damage on column four, that also seems like a stretch. Besides, I myself would’ve kicked with Midas, so I’d be able to pull Vitriol, Crucible and/or Kami forward to exert massive amounts of pressure onto the ball. Sam played it well to hold the ball in a corner and letting Alejandro come to him. He had the advantage in a straight-up brawl, and made good use of it.
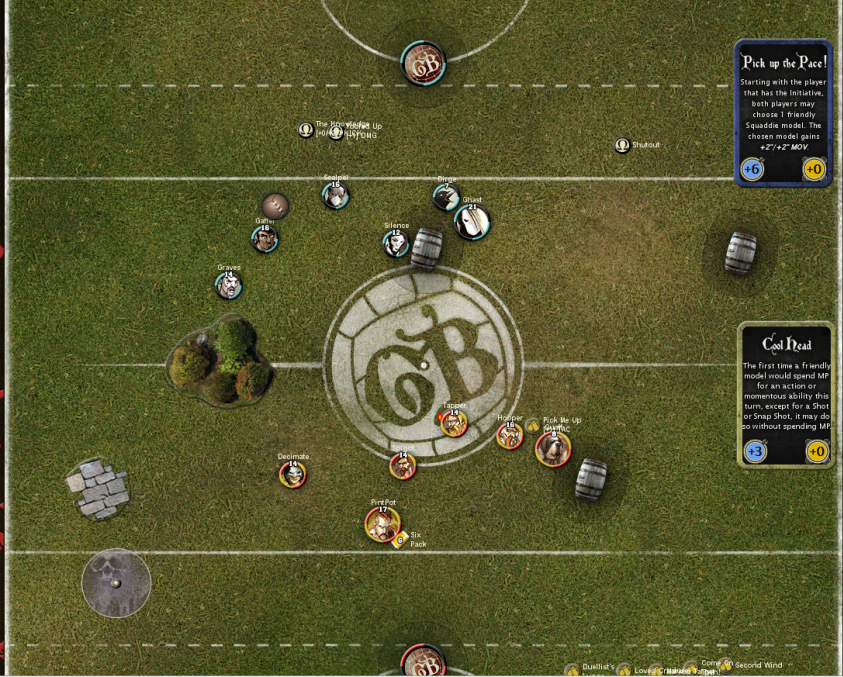
Table 27 – Krzysztof Bialek’s Morticians versus Aaron Wilson’s Brewers
- Brewers win the roll off and elect to kick
- Brewers line-up
- Tapper
- Quaff
- Spigot
- Pintpot
- Hooper
- Veteran Decimate
- Morticians line-up
- Scalpel
- Dirge
- Silence
- Ghast
- Graves
- Gaffer

Aaron decides to kick with Tapper and deploys rather tight, while the Morticians spread out to be able to receive the ball. They put Graves and Dirge on the wing as their main retrieval pieces. The ball goes short, almost into the forest on the center line.
Instead of going for the ball, Krzysztof decides to go with Silence first to Shutout and Fire Blast Tapper. Because of this, Veteran Decimate is now able to retrieve the ball for the Brewers, passes to Tapper and dodges backwards. As Ghast jogs into cover, Quaff comes up to Pick Me Up Hooper and Second Wind Tapper.
There are some more positioning activations between Dirge and Pintpot, and Graves puts Tooled Up onto his captain. Spigot jogs up, Gaffer gives The Knowledge to Scalpel and jogs, Hooper sprints to protect his captain. And then it’s Scalpel’s turn. Scalpel comes in to tackle the ball, pushes Hooper away with Voodoo Strings, and passes backwards to Gaffer to dodge out of melee and uses Second Wind to retreat even more. Sadly, Aaron elected to counterattack one of Scalpel’s attacks, removing Tapper’s ability to clear the fire and be able to reach anyone, so Tapper doesn’t do anything turn 1.
Krzysztof starts the second turn by placing Tucked onto Tapper, forcing him to have another wasted activation. Tapper activates Commanding Aura and throws a Marked Target onto Gaffer. Graves places Tooled Up onto Scalpel and retreats, giving Veteran Decimate the ability to charge Gaffer. She gets to tackle the ball, knock down Gaffer and Stagger him, before she kicks the ball back towards her squadmates. Using the ball to dodge upfield, Pintpot is able to get into Gaffer and take him out, after which he plays Come On Then!. (0-2)
Ghast moves into Veteran Decimate and Pintpot and is able to put the lass on her ass. Quaff gives Hooper a Pick Me Up. Scalpel takes out Decimate and deals some damage to Pintpot, after which Spigot sadly misses a tap-in pass to Hooper, not giving Hooper enough range to be able to beat some face. The pass is intercepted by Tapper, and Spigot gets in position for a Times Called. (2-2)
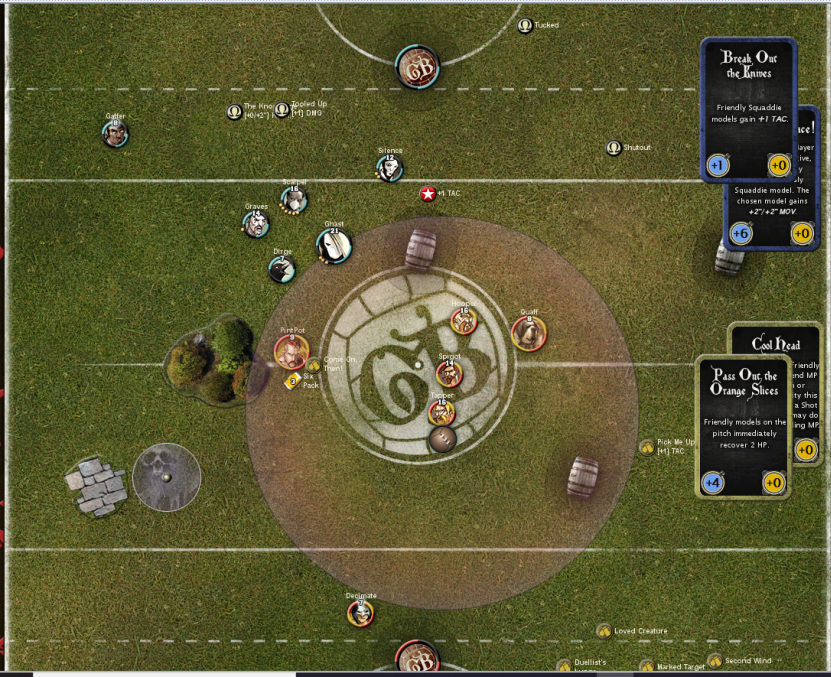
Turn three start with Silence, again hitting his plays on the Brewers – Shutout on Tapper and Tucked onto Hooper. Hooper goes in on Ghast and knocks him down, after which Graves gives Scalpel the damage buff again. Decimate comes into Graves and pushes him base to base with Pintpot and heals herself, but Scalpel just flies in to delete both her and Pintpot from the pitch. (6-2)
Because Scalpel made Ghast stand up again, Spigot now charges into to knock him down again, but Ghast himself stands up and knocks both Hooper and Spigot down. Tapper tries to pass to Quaff, but misses, and then decides to charge Graves.
Sadly, this is where Aaron’s battle report ends. The game seems to end with Krzysztof not giving Aaron any respite in the scrum, and Aaron just going for goal with Quaff to get some more points in. Krzysztof’s Silence play seems to have been the deciding factor of this match, along with some mistakes on Aaron’s side. I would have liked to see what would’ve happened if Aaron hadn’t fumbled his passes in turns two and three, but alas.
Table 29 – Niels Hermkens’ Engineers versus Iain Torrance’s Miners
- Miners win initiative and elect to receive.
- Engineers line-up
- Rivet
- Mainspring
- Veteran Velocity
- Colossus
- Ratchet
- Spade
- Miners line-up
- Shaft
- Digger
- Mule
- Fissure
- Fuse
- Spade
The Engineers decide to kick with Spade, while Velocity, Colossus and Ratchet are within 2″ of Rivet. The Miners spread out, letting Fuse and Spade be their receiving models. The ball goes wide towards the left, behind a forest, so Iain will have a tough time recovering the ball.
I forgot to make screenshots, only of the final moments… whoops!
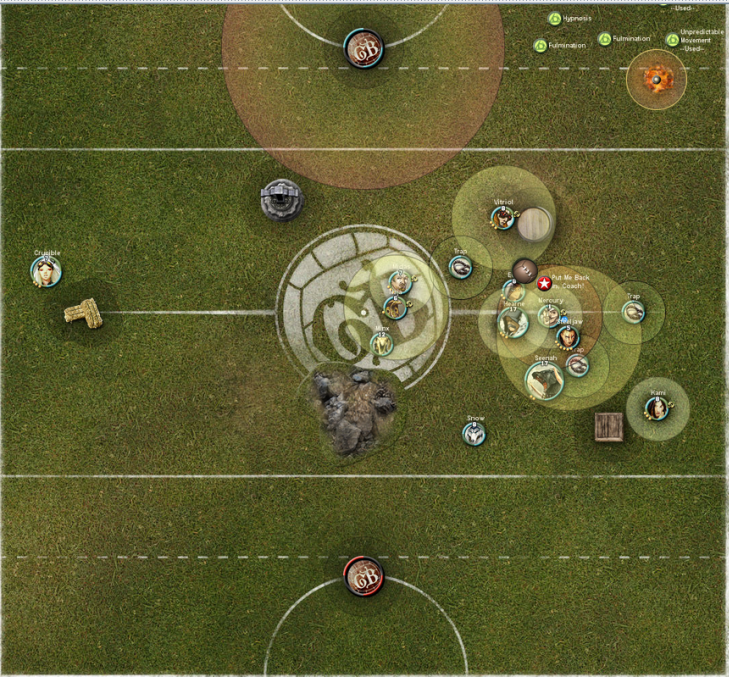
Fuse jumps towards the ball and is able to get it passed to Fissure. Rivet sprints forward and pulls the three aforementioned models forward, together with Spade. She gives Velocity a 2″ melee zone with Use This! and some momentous damage via Elbow Grease. She also activates her heroic play, Protect Those Close, as the Miners are well known to knock people on their asses.
Fissure proceeds to pass the ball to Digger, and moves into the scrum with Grinding Tracks to trigger Sturdy on Rivet and Spade. I don’t see any problems yet, so I jog up Mainspring. Now, Mule also comes to party, trying to annoy my Veteran Velocity by knocking her down and playing Lockdown. Spade dislikes this bot annoying her buddy, so she pushes it away with Controlled Explosion, and push-dodges Fissure even closer into the scrum.
Shaft only received a single point of influence, so he doesn’t do much except jogging up to do something next turn. Ratchet now stands up Velocity with Fixer and gives her Tooled Up, while moving in to also engage Fissure. Digger passes the ball to the Miners’ Spade and moves up to be ready to clear some conditions in turn 2. Colossus now moves into engage both Mule and Fissure, knocks the tank down and puts Singled Out on her. Iain’s Spade proceeds to score a goal and the kick-out scatters onto my Spade. (0-4) Velocity then batters the tank and puts it on 1 HP.
Turn 2 starts off with Spade finishing off the tank and scoring a goal for a 6 VP run. (6-4) The kick-out goes straight for Mule, who goes into Colossus, knocks him down, gives him a Lockdown, and then moves up to score the Miners’ second goal. It’s getting interesting! (6-8)
The kick-out scatters near Mainspring, who picks it up and punts the ball towards the Miners’ goal line, far from anyone to be able to get it. Iain sees that I’m getting ready to take someone out, so he runs his Spade away. Ratchet clears Colossus’ conditions with Fixer and puts Tooled Up onto his captain. He also jogs a bit forward, closer to Shaft.
Fuse then proceeds to jump towards the ball and tries to punt it up-field towards Shaft by using his Remote Detonation, but the ball scatters too far to the right, ending up behind the goal line. This means Iain can’t get momentum anymore, and none of his models can get to it. He jumps to Spade with Under the Lines. Veteran Velocity now walks to be between Shaft and Mule, ready for a Tow.
But instead of backing off with Shaft, he decides to engage Ratchet, Weak Point him, knock him down, and push Velocity away. This decision baffles me still, as beforehand I wanted to focus my attention on trying to take out Mule, expecting him to run away with his much less durable captain. Because of this, Colossus moves towards Shaft, staying within Mule’s melee range, knocks him down, and puts the Singled Out buff on him. Lastly, to make matters even worse, I am able to Unexpected Arrival to push Mule away from Colossus. Digger then decides to move up and engage my Spade as well, standing Shaft up with Stop, Drop and Mole. Rivet doesn’t really care, and she deletes Shaft. (8-8)
The game ends on the first activation of turn three, where my Spade is able to Secret Tunnel away from Fuse and Digger, charge Fissure, who had just picked up the ball and stood in cover of the goalpost, and she hit all dice to get the tackle ánd a push-dodge. With Controlled Explosion, I pushed Fissure off the pitch and proceeded to then score a goal for another 6 VP activation with my striker. (14-8)
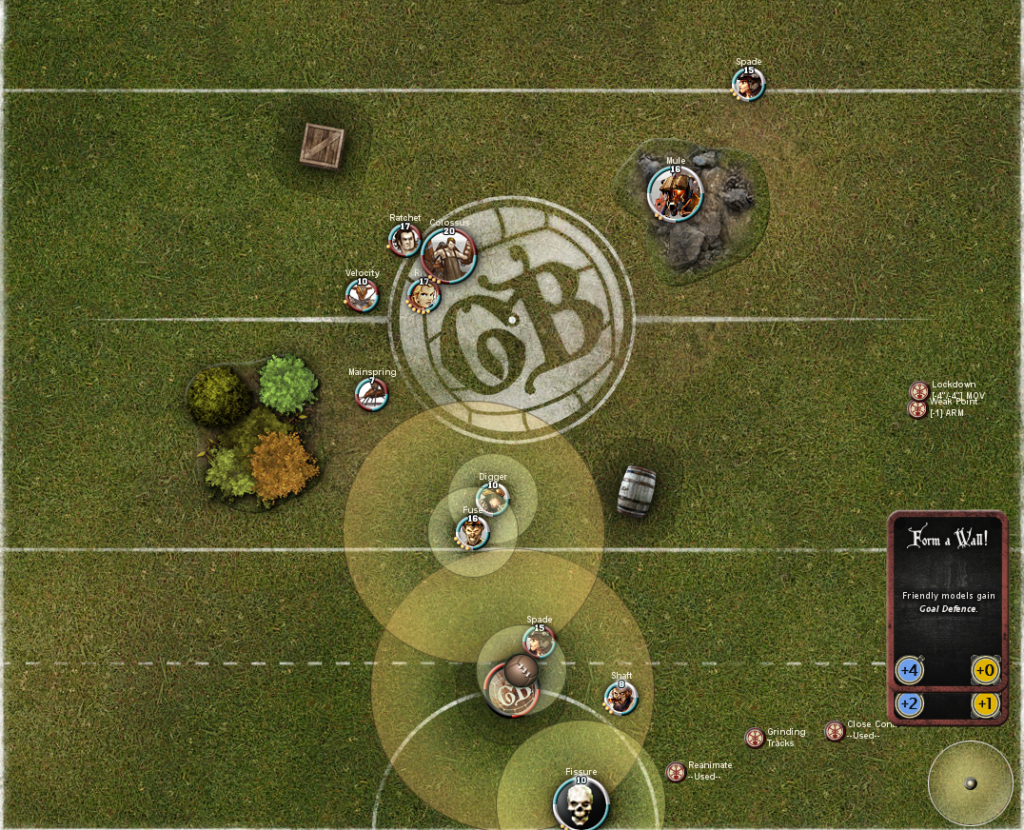
I feel that Iain made two important mistakes in this match. First, he threw Fissure and Mule into my lines on turn 1, while I had only activated one of my models ánd had used my kicking momentum to activate my Heroic play. I had all the time in the world to set up a take-out on the Fissure now, who isn’t really as tanky as people believe her to be. Mule wouldn’t be able to do anything, because of the sheer scrumming power that the Engineers have. Maybe if he’d have Throw‘n Velocity out of the scrum after Lockdown‘ing her… But his main mistake was engaging with Shaft in turn 2, rather than running away after maybe getting a nice Lodestone off. He could’ve retreated and started bashing onto my Spade, while Digger could’ve gone off to retrieve the ball the next turn, or at least be in the way for Spade. Still though… two 6 VP activations with Spade… That felt quite good. 😉
Conclusion
Next week, I’ll be getting battle reports for the following matches:
- Table 1 – Henry Kay’s Ratcatchers versus Peter Keil’s Blacksmiths
- Table 14 – David Cameron’s Engineers versus Dominic Westerland’s Shepherds
- Table 16 – Niels Hermkens’ Engineers versus Martin Edwards’ Fishermen
- Table 26 – Brian Andersen’s Farmers versus Stephen Mariahazy’s Hunters
See you then!