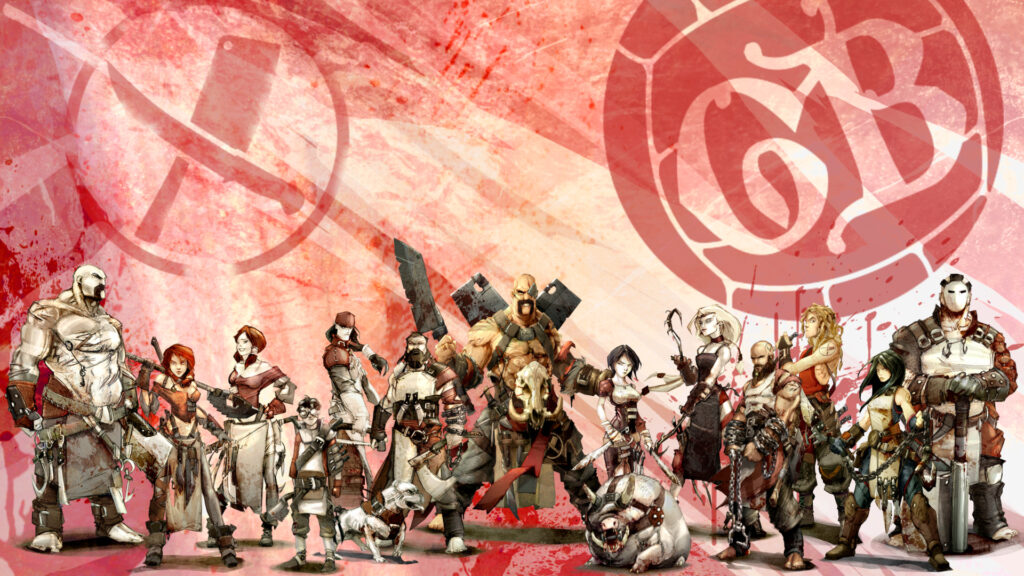
“Ox let out a blood curdling roar, the sound tearing from his core, shattering the determined silence from both sides as they prepared for the inevitable collision. Get ’em, boys!!!“
As one of the first Guilds to be designed for the game, the Butcher’s Guild is the epitome of one of the three playstyles of Guild Ball – killing enemy models, the other ones being scoring goals and controlling the action on the pitch. The first six to be released were captain Ox, mascot Princess, and squaddies Boar, Brisket, Boiler and Shank. In seasons 2 and 3, more additions were made in captain Fillet, mascot Truffles, squaddies Meathook and Tenderiser, and veterans Brisket and Ox. Through the Union in Chains event, a veteran version of Gutter was added to the line-up, and the Free Cities Draft gave the Butchers a designated striker in Layne. Lastly, Boar’s veteran version was added as a third captain, finishing up the roster of the Cleavers.
As the above shows, the Butcher’s Guild is mainly focused on taking out the opposition. They are designed to deal loads of damage without a lot of setup and are very fast or mobile, but the drawback to this is that they lack good control, decent range and their models are quite easy to take down themselves. A typical glass cannon playstyle, trying to grab a number of take-outs before scoring a goal to finish the game, or just play it out and go for six kills. Because of their speed, it’s not unusual to see them scoring two goals, but their mediocre KICK values make it so not many coaches will try for the 2-2 game plan.

The Team
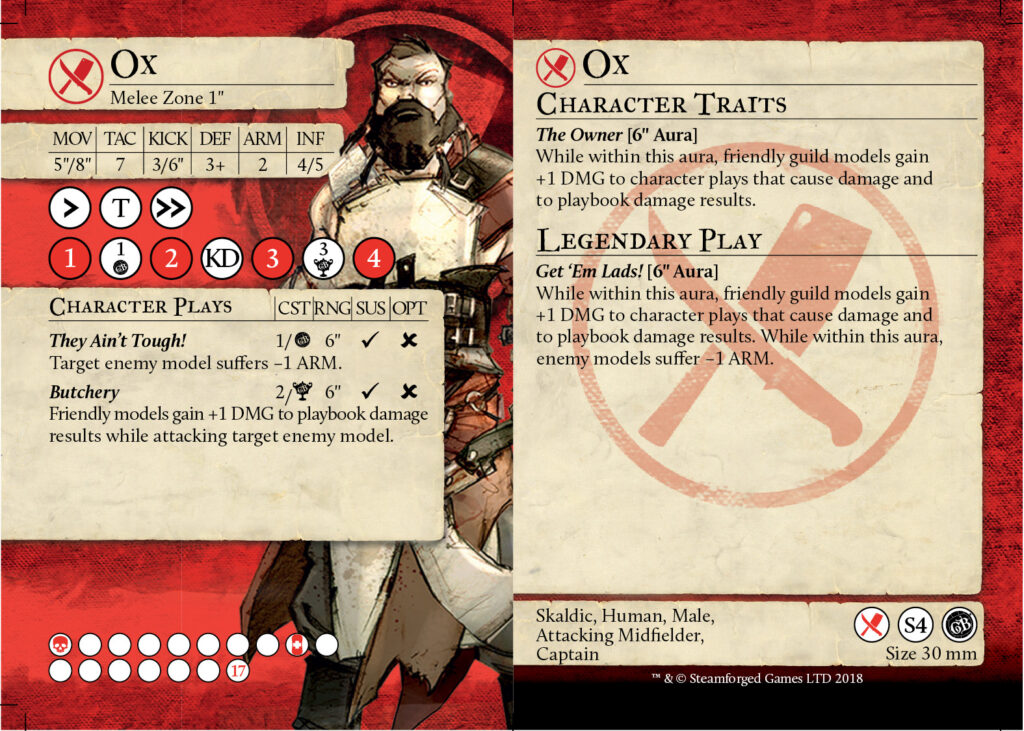
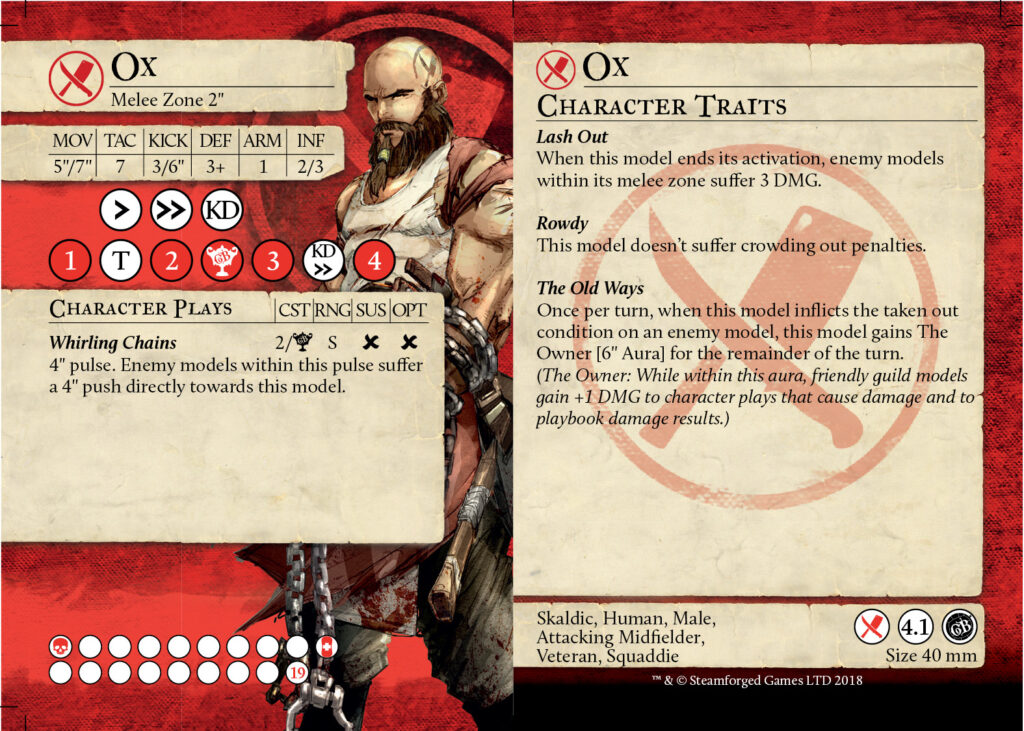
Ox – Captain
For many old Guild Ball players, still one of the most imposing models to see on the opposite side of the pitch. The Owner is a force to be reckoned with – Ox wánts the lines to clash, as this trait will make sure that his team will win the damage war, especially if he drops the legendary down early in a turn.
Important things to note:
- With an INF cap of only 5, he’ll often times not be the main receiver of influence, but he’ll let his squaddies to the work. Mostly, he’ll go for some setup through They Ain’t Tough, pushes, or a Butchery.
- Because of his 1″ melee zone and the fact that his KD is positioned fairly high, Ox has the problem of being dodged away from on a counter-attack, even with his 2 ARM. So if you’re trying to get Ox to one-round someone during the legendary turn, make sure he is able to stick to his target!
- With a sprinting distance of 8″, a decently positioned tackle, and a fairly comfortable KICK of 3/6″, it’s not unusual to see Ox try to go for a goal run to close out a game.
- Expect your opponent to try and control the positioning of Ox, and thereby the aura. Or to pull your squaddies out of said aura. Ox’ DEF 3+ is easily exploited by character plays, so be weary of that.
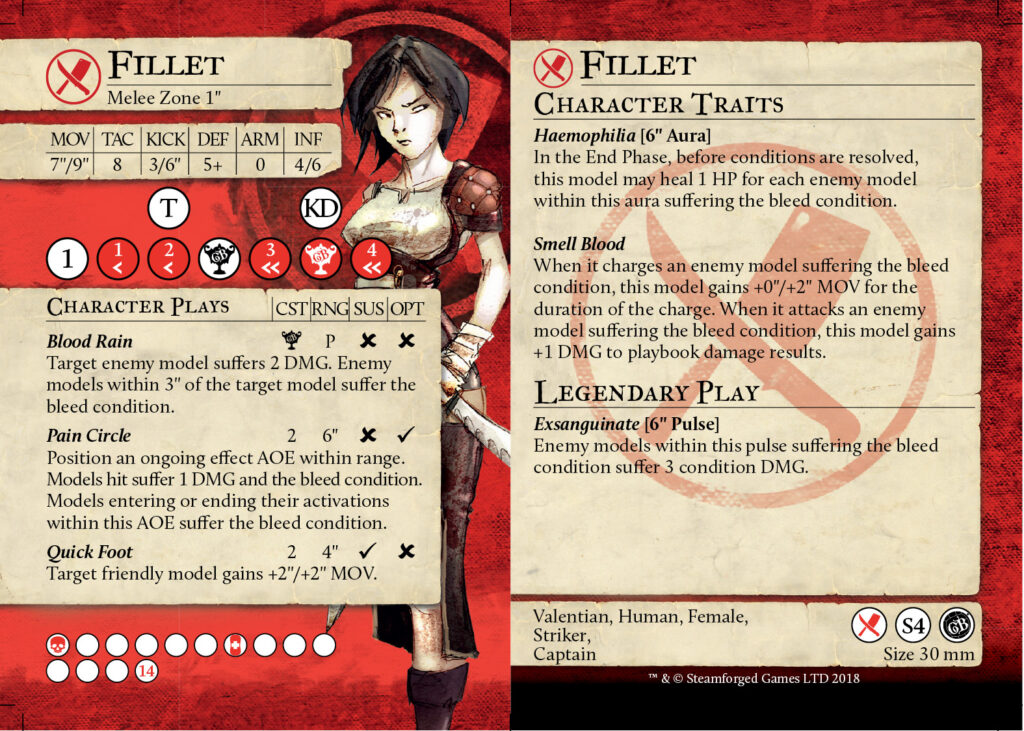
Fillet – Captain
If Ox is the captain that wants his squaddies to do the brunt of the damage, Fillet is the exact opposite. Fillet wants to kill the world… slowly bleeding out. She’s quite an aggressive lady, but you’ll grow to love her for it. Having dodges everywhere on her playbook and being fast also makes her a capable goal threat in her own right, when the stars align.
Important things to note:
- Fillet is a 1″ melee zone model whose main goal is to delete her target. If said target has a decent counter-attack with a double reposition on it, Fillet has no ways of re-engaging. This will often times result in having to hard-cast a Pain Circle, and then finish the activation. Be sure to choose your target well, so this doesn’t happen…
- Fillet’s main kill potential lies in the combo of Blood Rain and Exsanguinate. If you can get her to be your last activation, the bleeding condition will kick in, basically making the legendary play cause 6 damage instead of only 3.
- Fillet is one of the best targets to throw buffs on, just because she’ll use them well. Tooled Up, Get Set Bake, Get It While Its Hot… But don’t forget – Fillet herself can also buff someone through Quick Foot. I’m going to keep saying it – the team is highly mobile, so use it to grab a goal where you can.
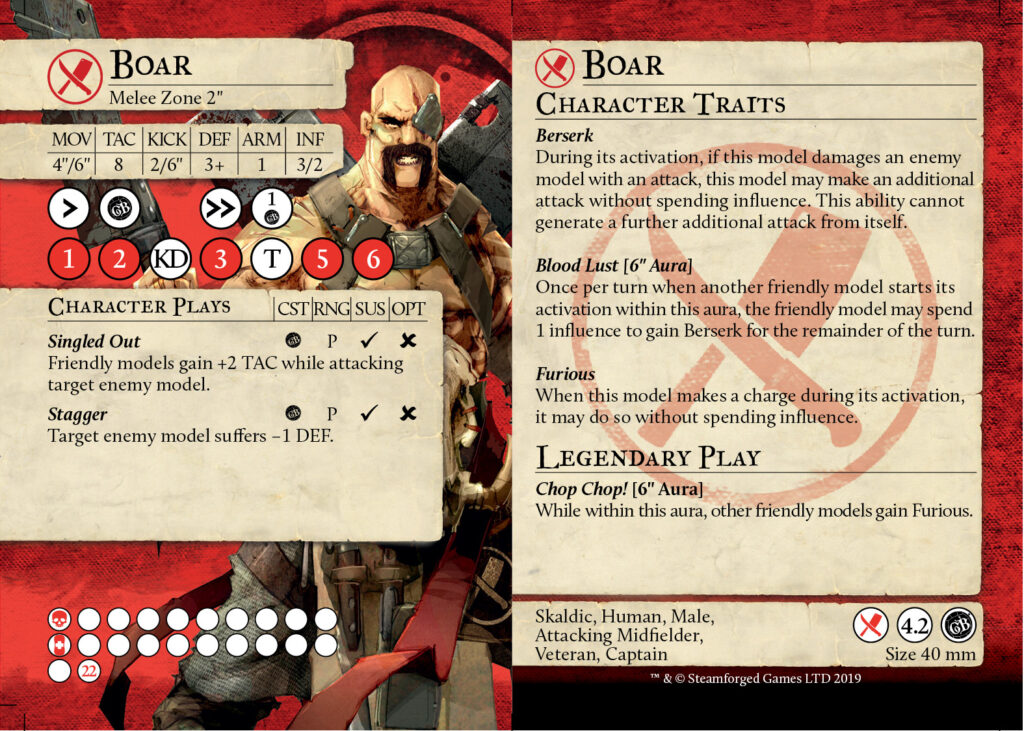
Veteran Boar – Captain
The Beast for some reason was able to receive captaincy due to the absence of Ox and Fillet suffering an injury. He’s not the fastest man on the pitch, but if he connects with something, they’re most likely just dead. Veteran Boar is one of the only models in the game which you can give a target, and it’ll one-round it, (almost) no matter who it is.
Important things to note:
- Veteran Boar is very dependent on being able to charge and reach the opposition. Your opponent will do everything they can to slow him down, or control his ability to charge altogether. Be sure to have a couple of squaddies (or Truffles) on hand to put down some control yourself and free up the big man to do his job, or to buff his speed via Get Set Bake, Quick Time, or by dragging models closer with Veteran Ox.
- A little FAQ about Berserk: Yes, you can kill someone with your first attack, move to a second and then attack them with the Berserk attack. No, you can’t kill someone with your first attack, charge into another model, and then have two Berserk ‘stacks’. You can’t have two instances of the same name on a model, so the charge’s Berserk ‘stack’ will fizzle.
- Just as with Ox’ legendary, often times it’s waiting for the right time to use Chop Chop! When used at the right time, it’ll often times be game winning.
- If you’re convinced that you’re not going to kill a model, use your Berserk attacks to provide some debuffs. A well-placed KD, Singled Out or Stagger could just be enough for a second model to kill off the target. Especially if they are Berserk themselves through Blood Lust!
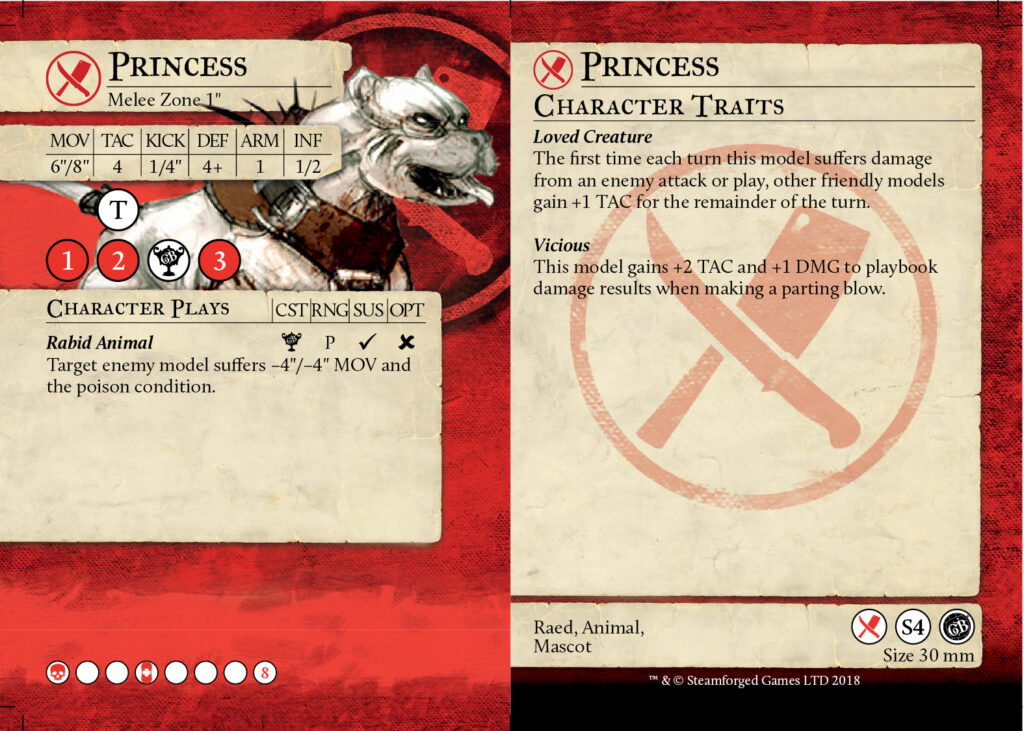
Princess – Mascot
Boiler’s dog is a nasty critter, who basically just loves biting ankles of those trying to get away from him. Only those that are elusive enough will even attempt to just walk away from the vicious mongrel.
Important things to note:
- Princess’ role on the pitch is three-fold:
- Just place her besides a model that you are expecting to move. Vicious and Rabid Animal make it very tricky for your opponent to just walk away, meaning that they’ll have to use influence to get away from the dog. With a bit of luck, they’ll miss the dodge/push and need to damage the pooch, resulting in a teamwide TAC buff through Loved Creature.
- Roaming death squad together with Boiler through his Assist. Due to role #1, the opponent will need to try and disengage from Princess or face Boiler’s wrath. Fun fact – Boiler is one of the highest damage dealers in the game, if you play your cards right. (Assist, The Owner and Tooled Up together make for a momentous 5 damage on 2 results… LOL!)
- Her passive 6″ jog speed makes her the ideal target to move around Cook’s buffs – Get Set Bake and Get It While It’s Hot. GSB make it an 8″ jog – how’s that for efficiency?!
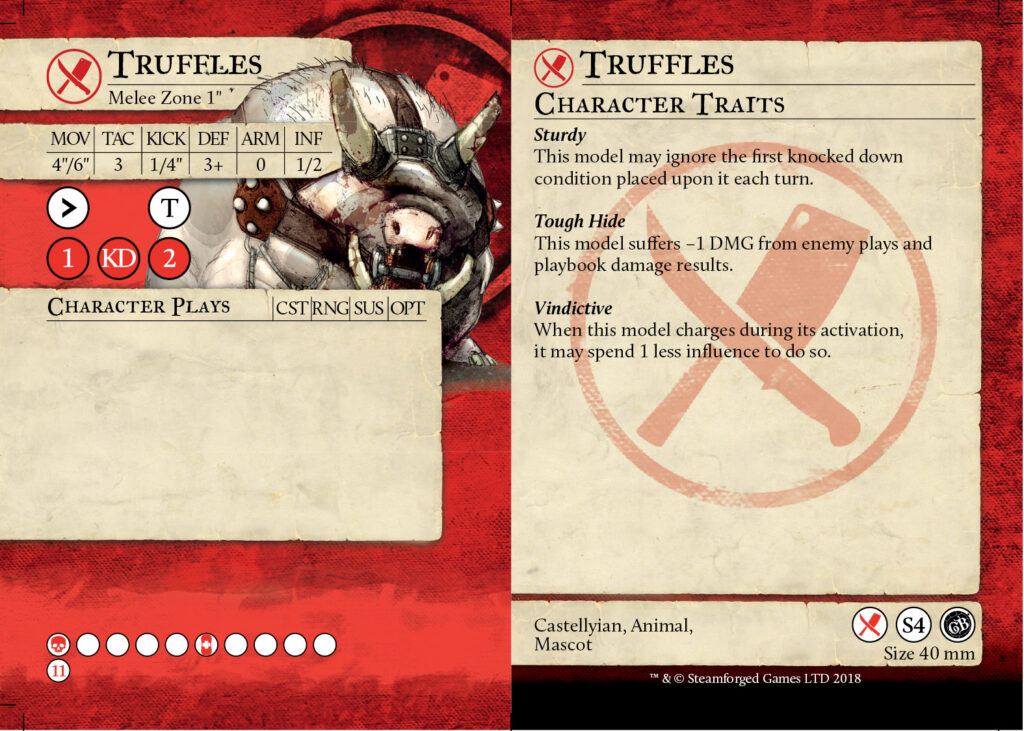
Truffles – Mascot
SQUEEEEEEEE!!!!!!!! That’ll be the sound your opponent hears, before they get taken down by a massive ball of meat. Fun times…
Important things to note:
- Truffles has the only momentous KD result in the entire Guild, and has some influence efficiency built-in through Vindictive. Sure, his reach is only 7″, but turning 1 influence into 1 momentum and an enemy model KD’d seems quite nice.
- Truffles’ 3+/0 defensive values makes him quite an easy bounce-target for mobile 2″ melee strikers. Be sure to position him to not get abused for those!
- Just like Princess, Truffles is also not easy to just walk away from. The KD is positioned in such a way that a simple bonus time to TAC 6 makes it an average result against regular defensive stat-lines.
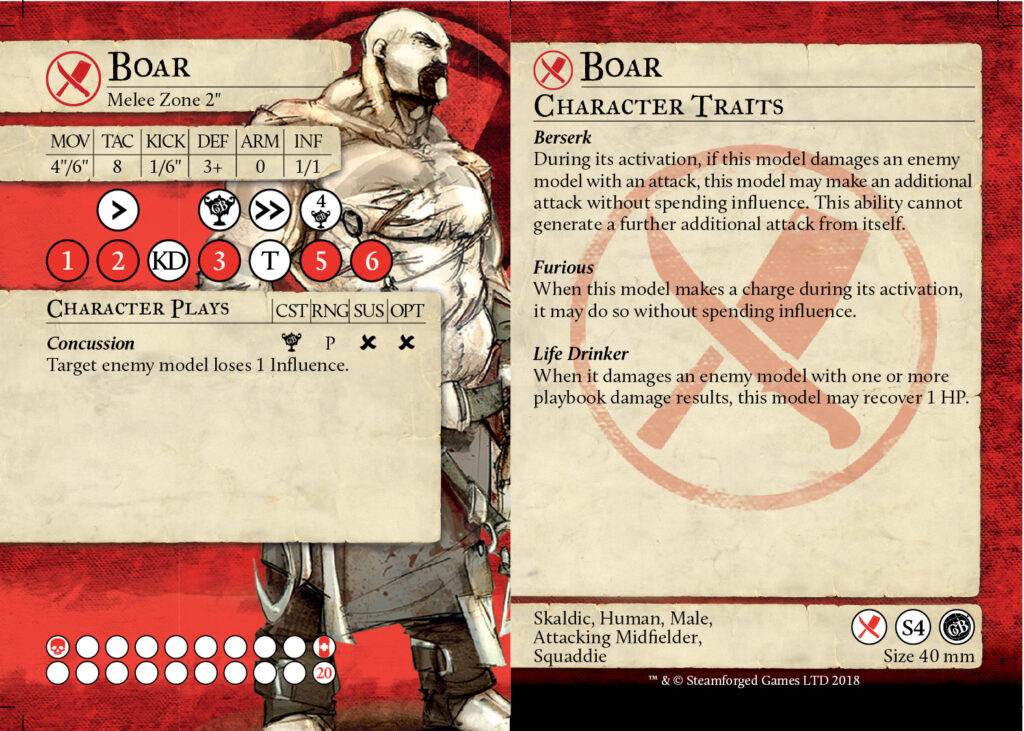
Boar – Squaddie
Something needs killing without any setup? This guy is your man. He won’t do anything else, but be sure that your opponent will try to avoid coming within 8″ of this guy.
Important things to note:
- While the squaddie version of Boar might not readily delete any model on the pitch, Boar has one added benefit in Concussion. If you’re able to reach that 4+CUP result on the sixth column, you’re basically hitting liquid gold. It’s actually fine to only deal 7 damage, but Concussion thrice. Losing influence is the worst feeling ever, especially if your opponent has loads of influence efficiency built into their own kits.
- If anything, Boar is self-sufficient. He’ll get better with damage or speed buffs, but doesn’t need them.
- On a 3+/0 defensive stat-line, Boar is very easily controlled. Be careful to play him into Guilds that can easily control his positioning, or just remove the influence he has. For example, putting Brick into him and Concussing the influence away makes Boar really sad, or putting Naja into him with Hypnosis.
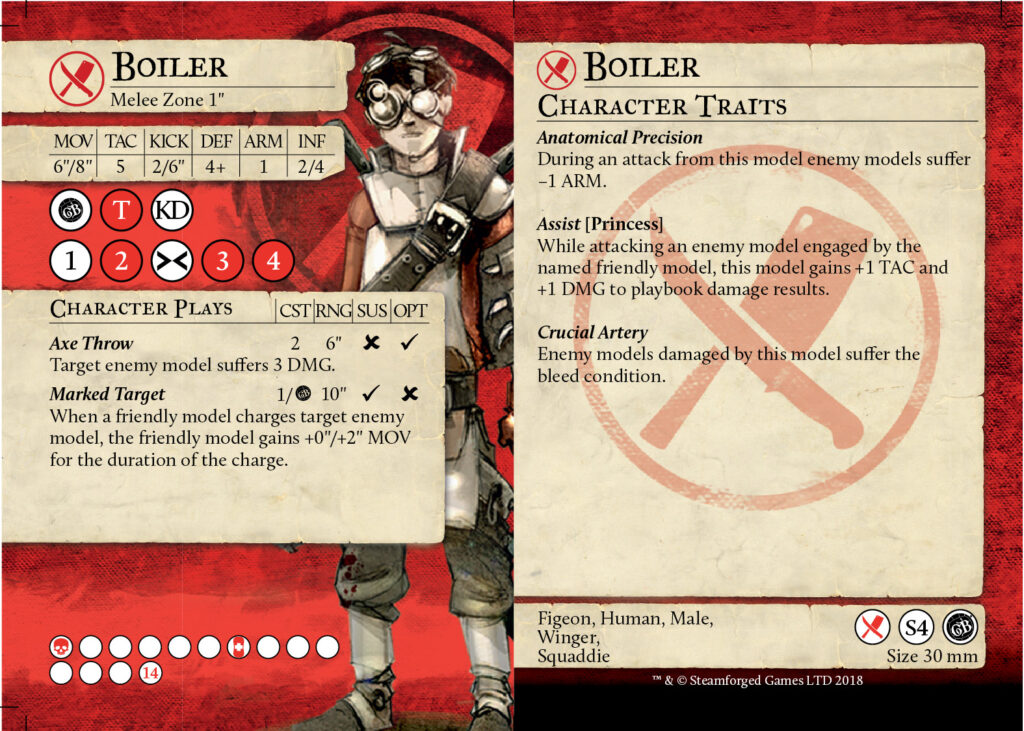
Boiler – Squaddie
The boy prodigy, the one that was supposed to take over the mantle. Don’t let yourselves be fooled by his small demeanor. He’ll slice you up even worse than Boar can…
Important things to note:
- As said before in the Princess section, Boiler together with Princess will deal way more damage than any other model in the Guild. Protect this fella’ with your life, as he’ll fall quite quickly himself.
- If you don’t want to put him in harm’s way, just giving him 2 influence for a nice bleeding Axe Throw can be nice setup for the likes of Fillet.
- Boiler is a must-have for match-ups where Resilience can be a back-breaker.
- Boiler is the only Butcher model with a momentous tackle on his playbook. If he can’t kill the ball carrier, use it! Punting the ball away usually deals more damage to a goal run than attempting to kill the model and being just out.
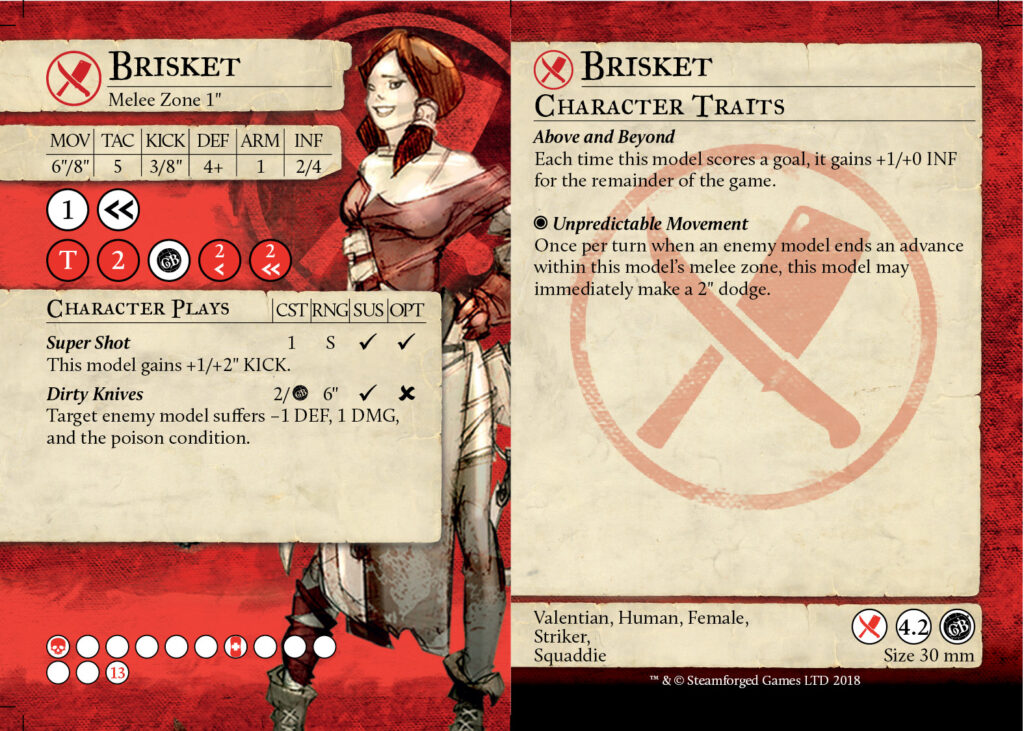
Brisket – Squaddie
Isn’t she looovellyyyy….. Like I said, the Butcher’s Guild also scores goals. And if it would be up to Brisket, the more the merrier!
Important things to note:
- If the Butcher’s Guild is faced with a match-up that might out-race them to 12 VP, it’s important to have a head start. Brisket usually helps with that by scoring an early goal through Super Shot, and then giving the team not one, but two extra influence to play around with for the rest of the game.
- Besides scoring goals, obviously Brisket can hold her own. She has a momentous 2 on column 2, which is basically the holy grail of playbook results, and she can set up other models through the Dirty Knives play.
- Whatever you do, don’t forget Unpredictable Movement… It can be a literal life saver.
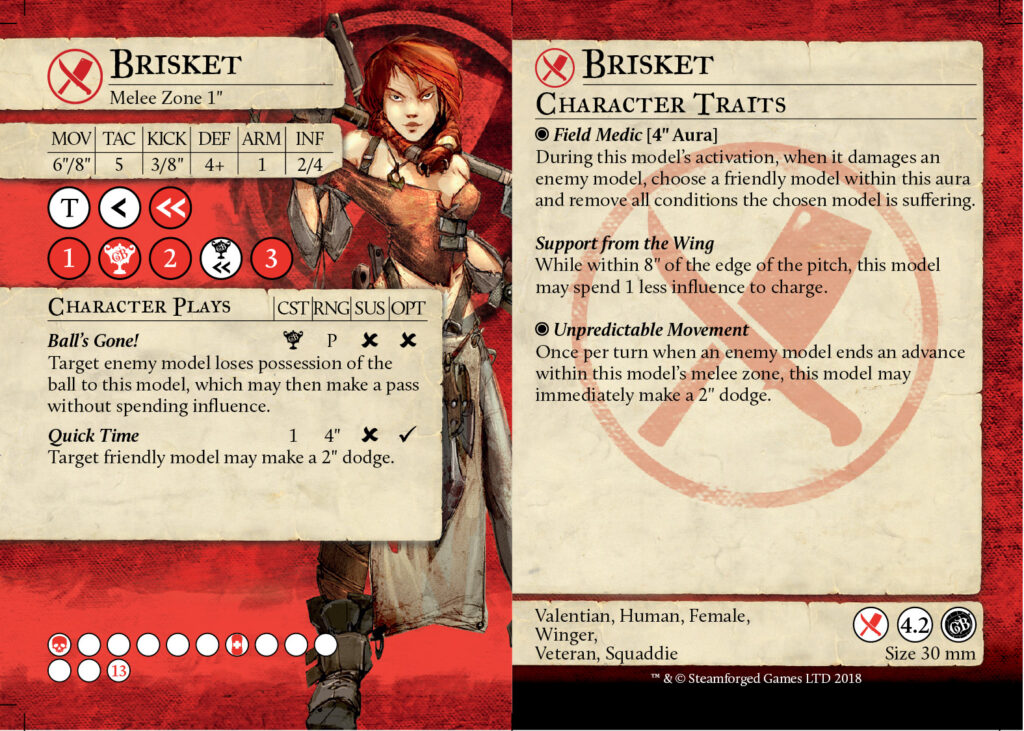
Veteran Brisket – Squaddie
The fight between Fillet and Brisket has left the latter scarred. Not wanting to get into the action anymore, she’s more focused on either capturing the ball for her team, or helping her team out of a sticky situation. Veteran Brisket can mostly be found away from the action, on the edges of the green, or right in the thick of it, helping her squad mates where she can.
Important things to note:
- Veteran Brisket’s card is a jumble of utility, which makes it hard to determine where she fits in best. Do you want her to be a winger, making use of Support from the Wing and Ball’s Gone, fully based on foiling goal threats, or being one herself? Or do you want her to be near the rest of the squad, helping people out of sticky situations through Field Medic and Quick Time?
- While Veteran Brisket has a tackle result on column 1, the important ball stealing result is the CUP symbol on column 2, which is momentous. Little known fact: Ball’s Gone states that you may make a pass. You’re not forced to do so, which means that you can also just use it as a regular tackle that goes around Close Control.
- Whatever you do, don’t try to use Field Medic. While it sounds amazing – dealing damage, gaining momentum and clearing conditions – Veteran Brisket’s playbook will most likely just cause you do deal 1 damage each time. If you’re spending 3-4 influence dealing 3-4 damage, you’re not accelerating the Butcher game plan. It’s a niche play and can help out if really needed, but it should never be your main plan.
- Whatever you do, don’t forget Unpredictable Movement… It can be a literal life saver.
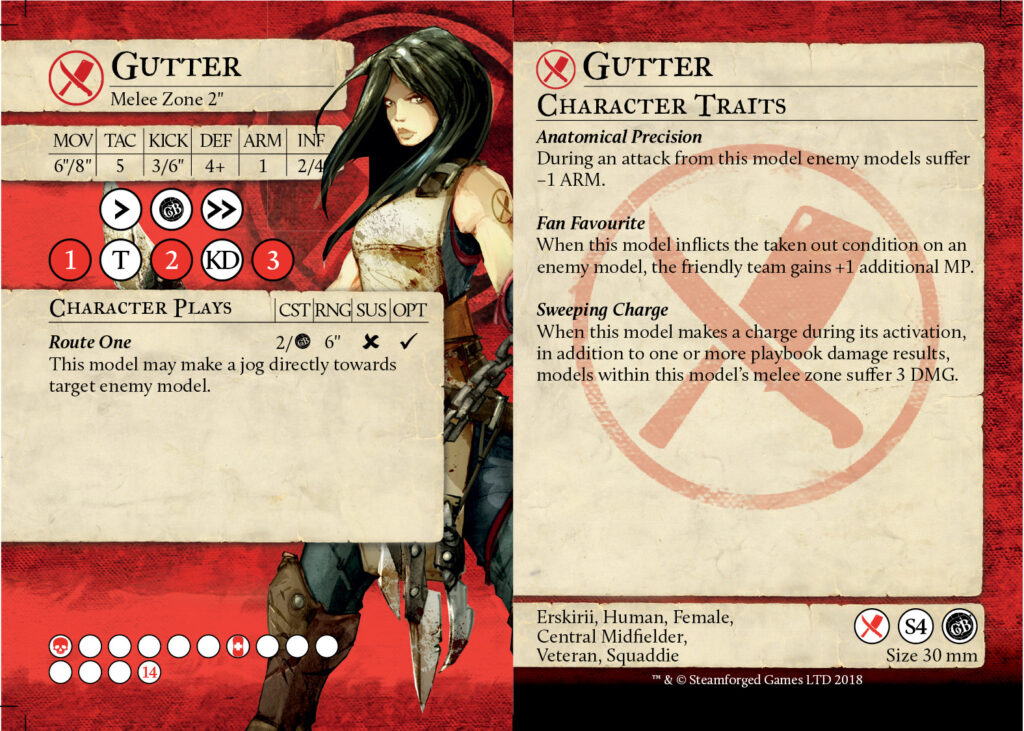
Veteran Gutter – Squaddie
The Sanguine Blade, it is what they called her from her time on The Union, under the Pirate King Blackheart. Be as it may, Gutter’s massive damage dealing days seem to be quite over. But what else can we use her for? 2″ melee zone… tackle result on column two with Anatomical Precision… nice 3/6″ KICK values… I wonder…
Important things to note:
- Veteran Gutter can be used for two separate roles:
- One is the simple one – using Anatomical Precision and Sweeping Charge to deal as much up-front damage as you can to a large swathe of enemy models. And maybe, just maybe, gaining some extra momentum if you’re able to take someone out through Fan Favourite. The problem here lies in Gutter’s playbook. Her damage track is far from amazing: 1-X-2-X-3. Sure, the extra 3 damage from a charge will most likely end up in her dealing 5 damage on the charge, but she’ll round it out with another 2-3 damage, still ending up with 8 damage dealt over 4 influence and only 3 momentum. The extra is the 3 damage you dealt to other models, but does that make up for it? I don’t know…
- The second role for Veteran Gutter is a bit more ‘out there’. The best goal scorers in the game usually have any combination of fast MOV values, good KICK values, easy tackle result, 2″ melee zone and extra mobility tech. Veteran Gutter has all of these (although one might say that Route One is the worst mobility tech designed), so maybe try this out for a change? Play her together with Fillet and a Brisket and you’ll have quite a bit of threat on the ball…
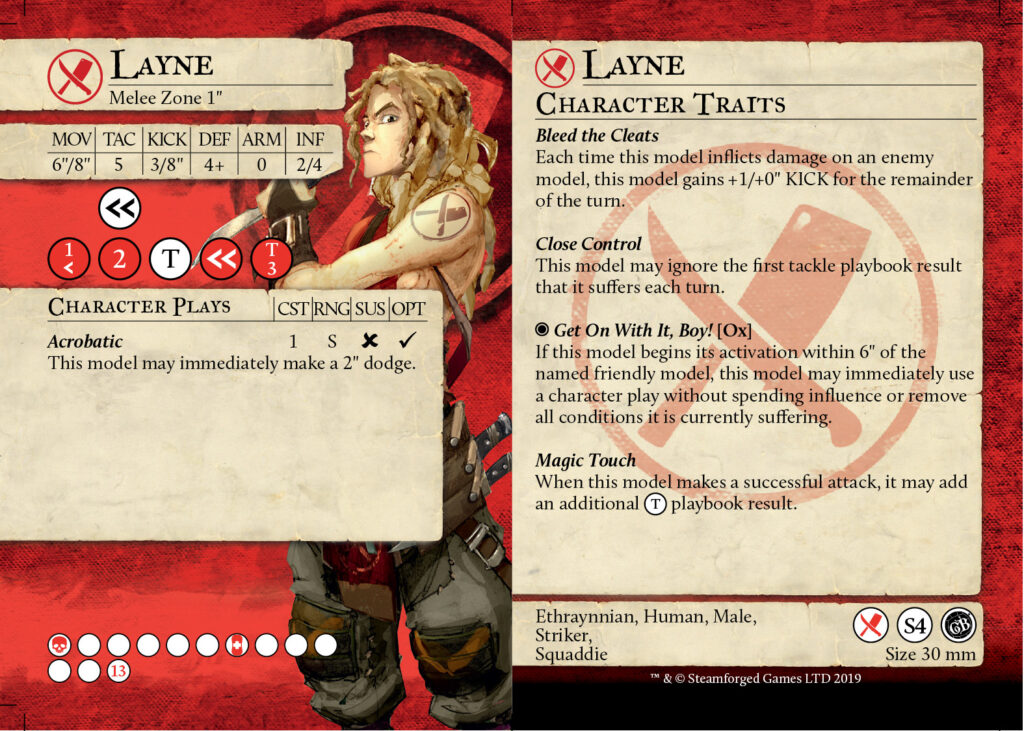
Layne – Squaddie
The Butcher coaches really wanted to get their hands on a striker during the Free Cities Draft event, and they got him. Sadly, “being a very good striker” just doesn’t belong within the so-called colour-pie of the Guild. Which means that, unless Layne is dealing damage, he’s not going to be anything special…
Important things to note:
- Besides Fillet and Shank, Layne is one the three models best suited for taking the kick-off if you’re deciding/forced to kick at the start of the game. Having a base threat on the ball of 11″, after getting up the pitch for (near) 6″, gives a close to 17″ of threat from the deployment line. Add either Quick Foot, Quick Time or Get Set Bake, and you’re getting quite some distance.
- Going for a goal run and getting counter-attacked by a 2″ reach model? Don’t worry – Magic Touch will make it possible for you to just take that double dodge into safety and still tackle the ball away from the big bad beater. You might not think it, but it still takes some people off-guard when it happens…
- With Magic Touch and Bleed the Cleats, Layne might just have the single most awesome first column playbook result: momentous 1 damage 1″ dodge +1/+0″ KICK tackle. And a double tackle on the third and fifth columns to get around those pesky Close Control users.
- Layne’s defensive values are 4+/0 with only 13 hit points. He’ll go down QUICKLY. Make sure he has done his job before this happens…
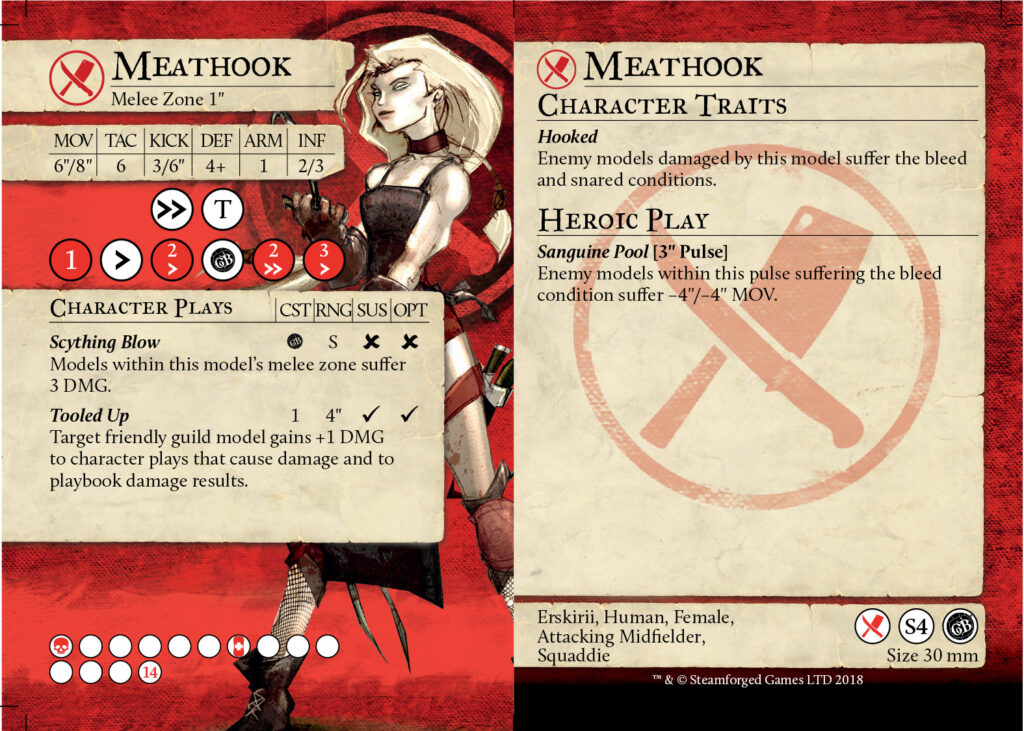
Meathook – Squaddie
Fillet’s little concubine is more than just a pretty picture. If you thought Fillet was bad, oh boy… Meathook is downright sadistic – she wants her opponent to feel as helpless as possible. Looking for a debuff model for your squad? You’ve found her.
Important things to note:
- Usually, people see Meathook as a simple Tooled Up bot, but she can be so much more. Through Hooked and Sanguine Pool, she has some of the best setup a single squaddie model can bring to the table. Add to that the possibility of getting these effects off onto multiple models via Scything Blow, and you’re done. Meathook isn’t about dealing damage, she’s about sending a message. An omen of murder waiting to happen.
- Again, another model with a very decent 3/6″ KICK value. Sadly, her tackle is quite high onto the playbook, so don’t expect Meathook to go onto a goal run on her lonesome. She’s more suited to attack the opponent’s models anyway.
Veteran Ox – Squaddie
After his forced hiatus from the Guild, Ox is back with a vengeance. He’s had to endure enough pain through his bindings, so he’s using them to hurt others now. Don’t get caught up into his chains, or face the wrath of the Master Butcher.
Important things to note:
- Just like his original version, Veteran Ox really wants the action to happen all around him. So much, that he now has an ability to pull enemy models towards him – Whirling Chains. The play is a self-targeted pulse, meaning that anyone within the pulse gets automatically pulled towards him. Sometimes, it’s just enough to sprint and hard-cast the play, just because of Lash Out also causing some free damage at the end of his activation.
- Another reason why Veteran Ox wants to be in the thick of it, is his trait The Old Ways, which basically causes him to get his old The Owner aura back if he is able to take someone out. If anything, Veteran Ox is the best setup you could have for a turn by taking someone out at the start of a turn, getting the aura, and then just using Whirling Chains to get as much people inside said aura at the same time. Watch your opponent scramble…
- Veteran Ox doesn’t have the staying power of his original form. At only 3+/1 and 19 hit boxes, it’ll take a while to take him down, but there are several beaters within the game that can easily one-round him. There are way more that only need a little bit of help. So if you do the above, be sure that Veteran Ox stays alive for your models to be able to make use of the The Owner aura.
- While only having a 13″ threat range towards the goal, Veteran Ox does have an easy tackle result on his playbook, and has a very decent 3/6″ KICK value. Again – if a goal is on the table, just go for it!
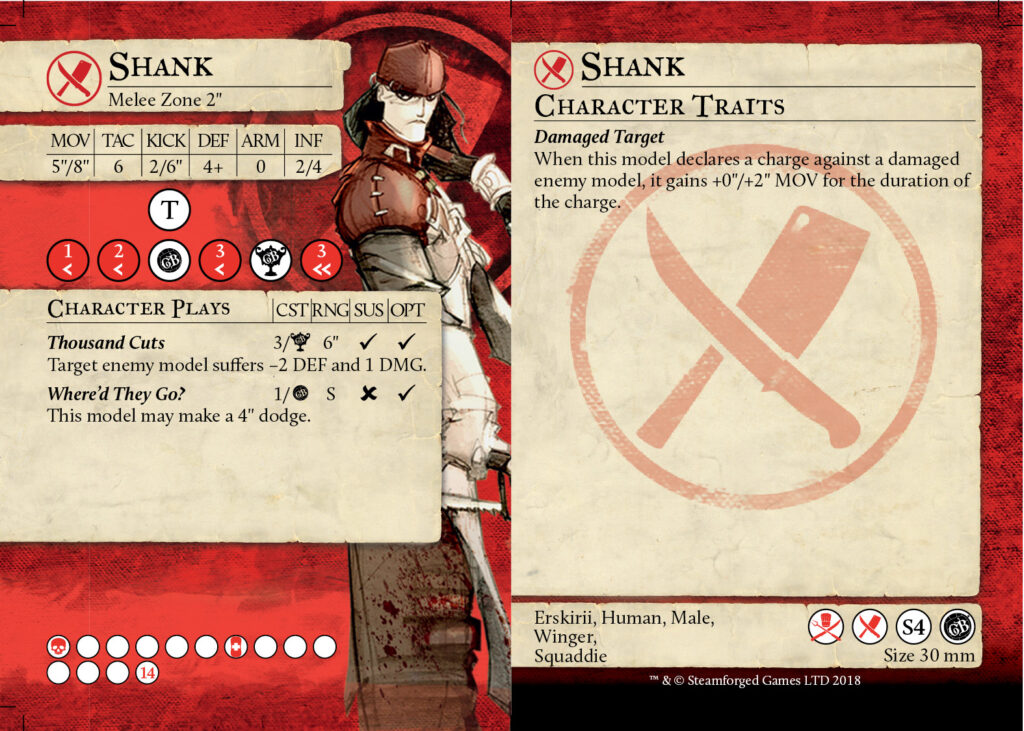
Shank – Crossover Squaddie
I’m not sure who was designed first, Shank or Decimate, but it’s clear that the game developers had the same idea in mind. A highly mobile damage dealer with some utility in Thousand Cuts. Shank is the epitome of speed – there’s no place that the opponent’s models can hide, especially if they’re already damaged.
Important things to note:
- Shank has an 18″ goal threat. Sure, his 2/6″ KICK value isn’t that great, but again – use it!
- Due to Damaged Target and his enormous threat range, Shank is very adept at killing off models that have just returned to the pitch on low life totals.
- Shank’s playbook is amazing, and only gets better with buffs. Give him Tooled Up, provide him with Berserk, maybe make him Furious through Chop Chop! or charge more efficiently through Get It While It’s Hot. As said before, Shank is one of the three decent kicking models the Guild has access to. If you’re not playing Fillet and don’t want to threaten an early goal, Shank is your go-to. Just make sure that your opponent doesn’t have a way to delete him before he activates, as his 4+/0 with 14 boxes is very fragile. If they can’t, you’re most likely just getting a take-out.
- If the above works in your favour, don’t kill your target. Leave it on low HP, kill it the next turn, charge the ball holder for a tackle, and then try to score for a nice 6 VP activation to start off turn 2. Sure, Shank will most likely die for it, but I’d say that that is an excellent trade-off. If Shank can’t get the goal, just kill his target and use his excellent speed to bounce back to his buddies.
- If anything, Shank will provide you with the following: 8 damage, 4″ of dodge, 4 momentum for 4 influence.
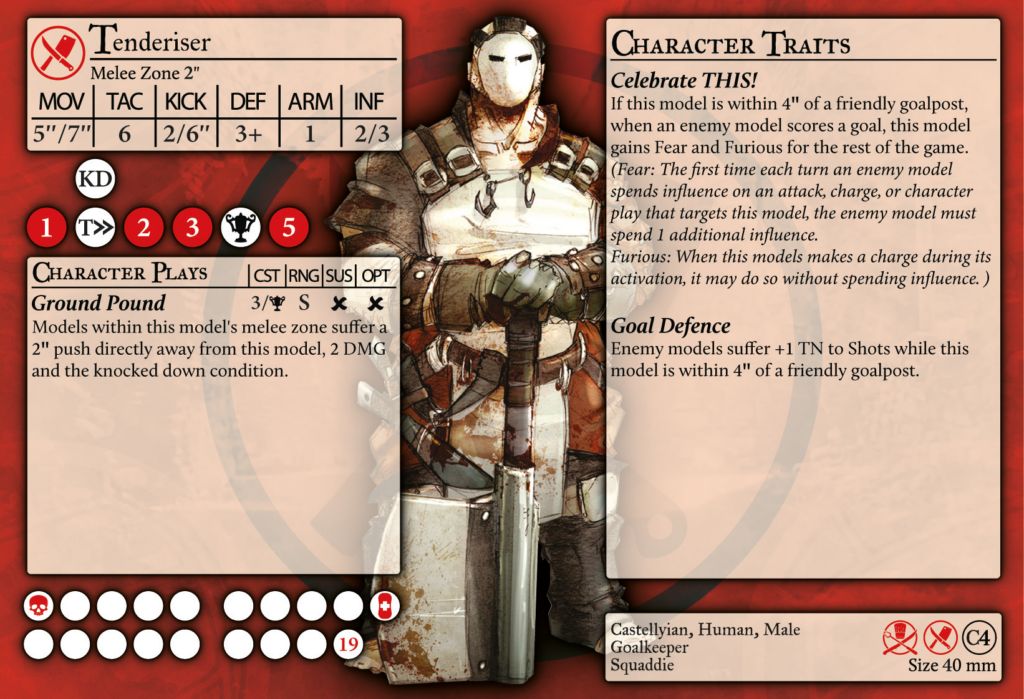
Tenderiser – Crossover Squaddie
Blabla
Important things to note:
Cinnamon – Crossover Cooks’ Squaddie
Blabla
Important things to note:

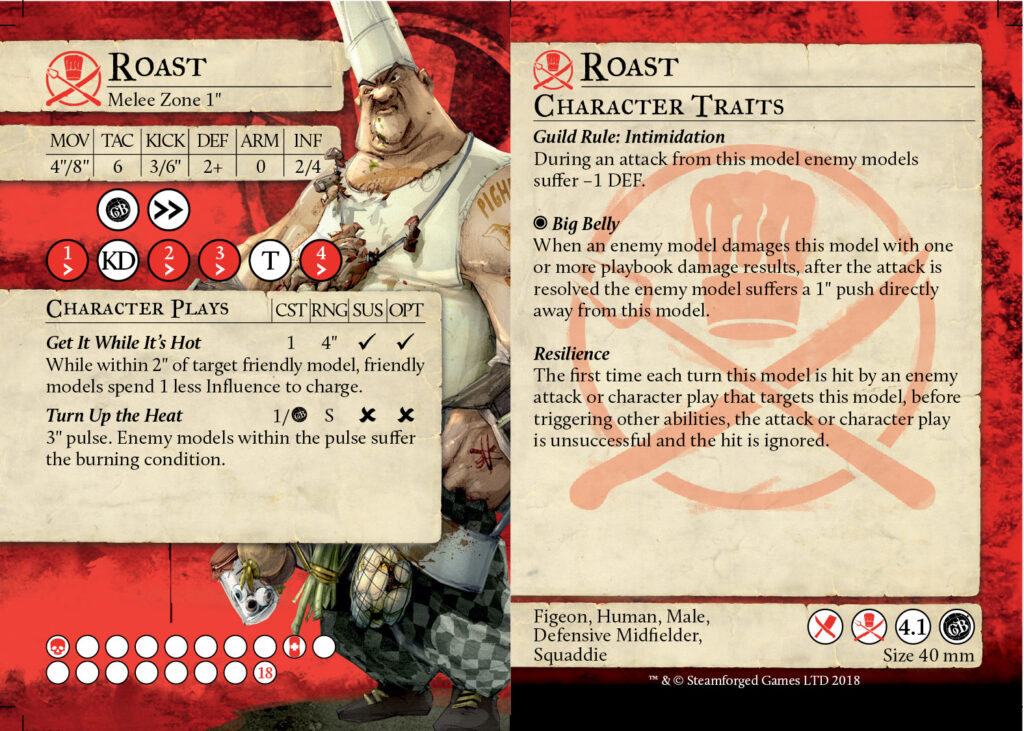
Roast – Crossover Cook’s Squaddie
Blabla
Important things to note:
The Game Plan
Kick or Receive?
Victory Objective
The Tactics
Alchemist’s Guild
Blacksmith’s Guild
Brewer’s Guild
Butcher’s Guild
Cook’s Guild
Engineer’s Guild
Miner’s Guild
Farmer’s Guild
Shepherd’s Guild
Fisherman’s Guild
Navigator’s Guild
Hunter’s Guild
Falconer’s Guild
Mason’s Guild
Mortician’s Guild
Ratcatcher’s Guild
The Union
The Order of Solthecius