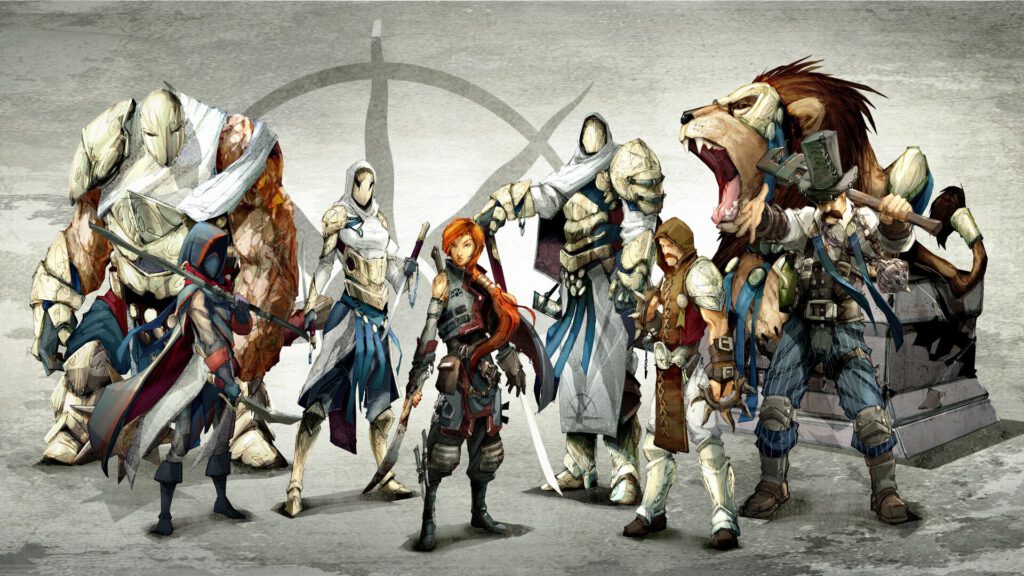
“The air surrounding the game had become far more violent over the last months, matching the raised sense of hostility and suspicion amongst the Guilds themselves. Some greater agenda was still being played out, and Brisket couldn’t shake the feeling she and her teammates were at the centre of it.“
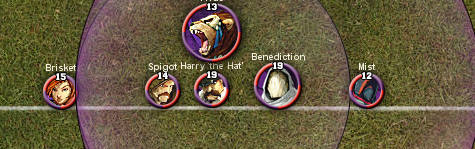
The Order of Solthecius was introduced to the game by the additions of Benediction and Grace to the line-up of the Order, soon to be joined by characters as Seasoned Brisket, Seasoned Spigot, Veteran Fangtooth and the mascot, Pride. While at first these Order players could play for the Union as well, they soon were changed into the Union’s minor Guild, making Benediction, Grace, Harry ‘the Hat’ and Mist the crossover players.
As a Guild, the Order has a definite goal-scoring focus. Brisket, Spigot and Mist are top-tier strikers, backed up by a solid supporting line-up of Harry, Benediction and Grace. But don’t let this deceive you, as the Guild also has access to a strong beater in Fangtooth. While most games will end up with the Order scoring three goals, the so-called ‘2-2’ game plan is very much a possibility for them against the less sturdy of squads…

The Team
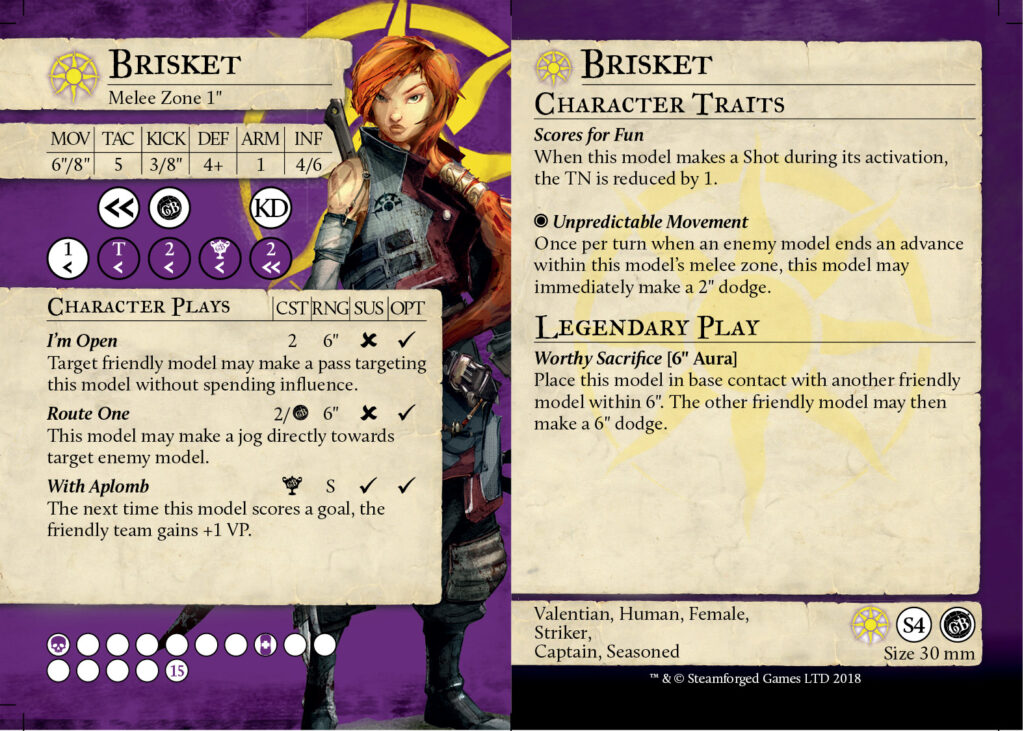
Seasoned Brisket – Captain
The ex-Butcher lass, who actually had the opportunity to steal the Butcher’s captaincy from Fillet – if this is new to you, please read the lore from the Butcher’s Civil War, it’s great! – was picked up by the church of the Free Cities to captain their Guild Ball squad. As she was in the Butcher’s Guild, she still is very much an elusive model with a big focus on scoring goals.
Important things to note:
- Scores for Fun only works on Shots made during Brisket’s activation, which means that it doesn’t work on Snap Shots.
- Momentous T< on column 2 with TAC 5 makes her ability to grab the ball quite unreliable.
- Brisket’s maximum distance for a goal run (without Legendary) is 28″.
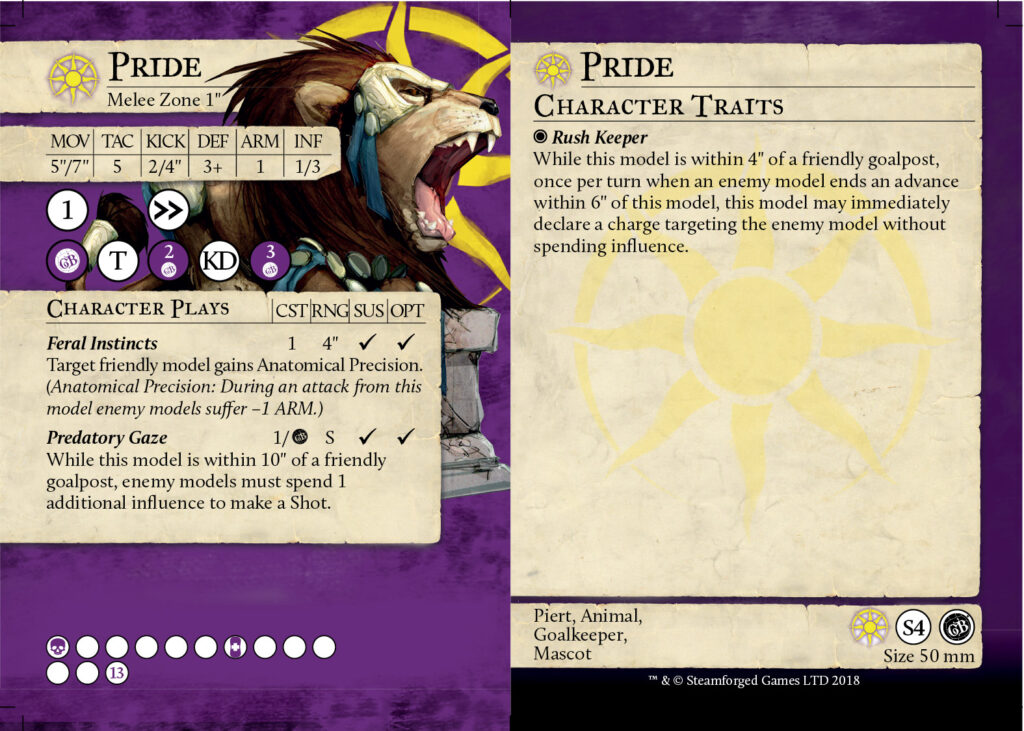
Pride – Mascot
Being one of the only models left with the Rush Keeper trait, Pride is quite an excellent goalkeeper. The fact that he also has access to Predatory Gaze means that the Order is (mainly) a goal-scoring Guild, that has a great way of halting other goal-scoring teams in their race towards 12 VP. Obviously, Pride can also be used to protect other models with the double push on column three, but his 50mm base makes positioning for a defensive Rush Keeper charge quite hard.
Important things to note:
- Feral Instincts gives Brisket a better chance at reaching her tackle result, or can give Fangtooth some ARM shred to deal more damage.
- Pride likes to stick to his goal, which means that his usefulness decreases the further your opponent plays away from your goal. Do keep in mind, if Pride’s goalie traits aren’t needed, he has a decent playbook and can deal more damage than some of your actual squaddies! At the least, he’ll give another gang-up bonus.
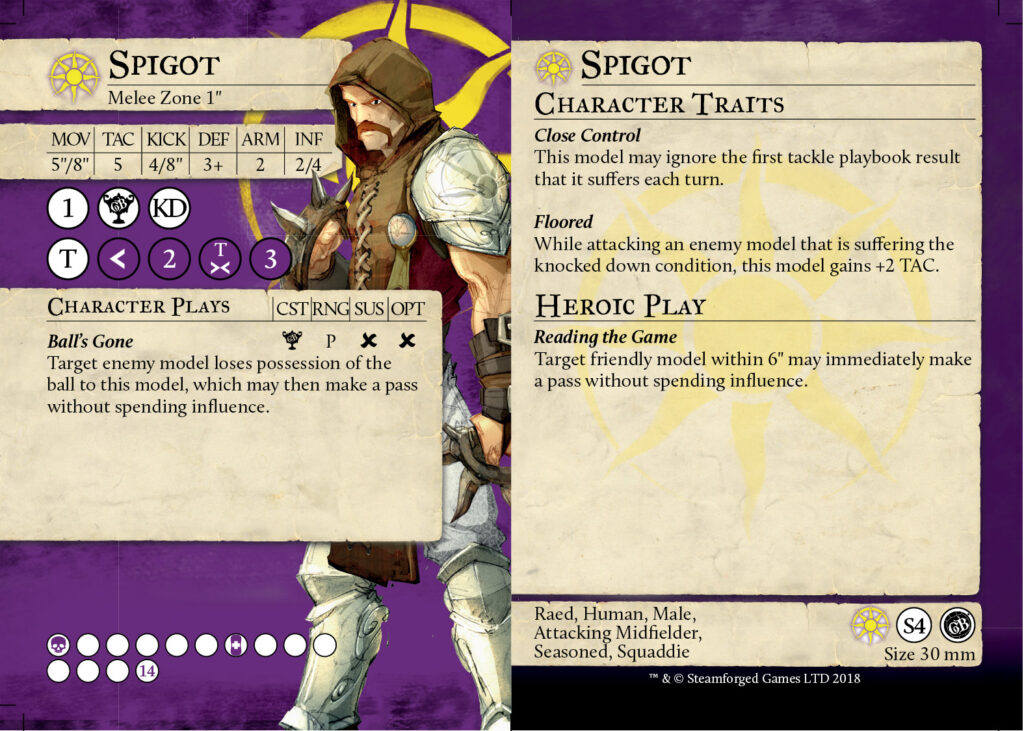
Seasoned Spigot – Squaddie
Most experienced Order players would say that Spigot is the team’s actual captain. His ability to score goals, affect the board-state with dodges through the Ball of Light and his Heroic Play, steal the ball from hard places with a tackle on column one and Ball’s Gone on column two, and play as an off-role beater through Floored gives him loads of agency on the pitch. Spigot is one of those models that should never be left on the bench.
Important things to note:
- While Spigot doesn’t have a dodge on his tackle or Ball’s Gone, he does have Close Control, which means that only a KD can stop him from stealing the ball from an enemy model.
- Spigot’s maximum distance for a goal run is 28″.
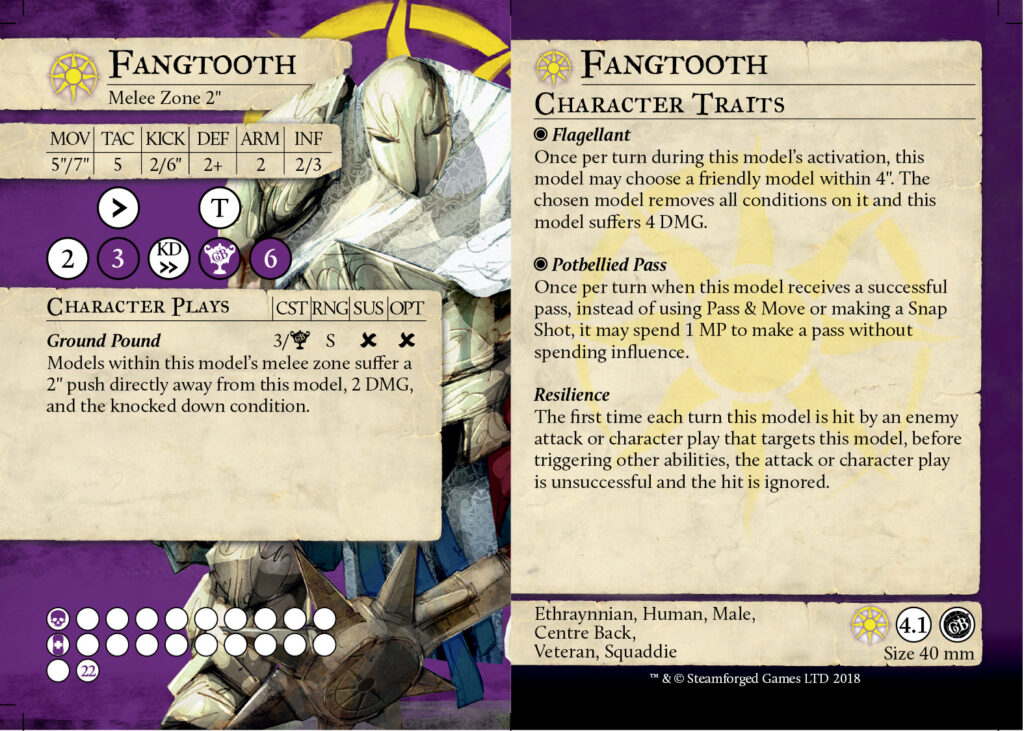
Veteran Fangtooth – Squaddie
The sole reason why the Order can also be played with a game plan with take-outs; the first member of “The Big Three”. While Spigot can obviously dish out some damage through some setup and Floored, Fangtooth is the model that will actually delete enemy models from the pitch. Besides having a high damage output, Fangers also brings loads of utility with Flagellant and Potbellied Pass.
Important things to note:
- Fangtooth’s KICK is only 2/6″, so you better have enough MP to bonus time those Potbellied Passes, or at least be on tap-in distance.
- If Fangtooth is ganged up upon, Resilience and Ground Pound are great tools to free him up. But here’s a rule of thumb: don’t let Fangers get ganged up upon, as he’ll go down quite quickly with a concerted effort.
Benediction – Crossover Squaddie
The second model of the “Big Three”, Benediction is very much a supporting model with loads of scrum potential. Easy pushes, strong defensive character plays and a multitude of utility traits means that Benny might be one of the most important models for the squad in terms of resource efficiency when in a scrum situation.
Important thing to note:
- Playmaker is a trait that should never be forgotten, as it basically adds another influence to your strikers, as they’re using the BoL to gain distance on ball retrieval or a goal run anyway.
- Besides having a decent goalkeeper in Pride, Benediction actually is one of the best places to put the ball to keep it safe. Braced, Poised and the easy pushes means that any ball retriever that relies on their playbook tackles will be having a hard time getting it off of him.
- I mentioned that Spigot’s only weakness on ball retrieval is a KD. Stand Firm makes him ignore that.

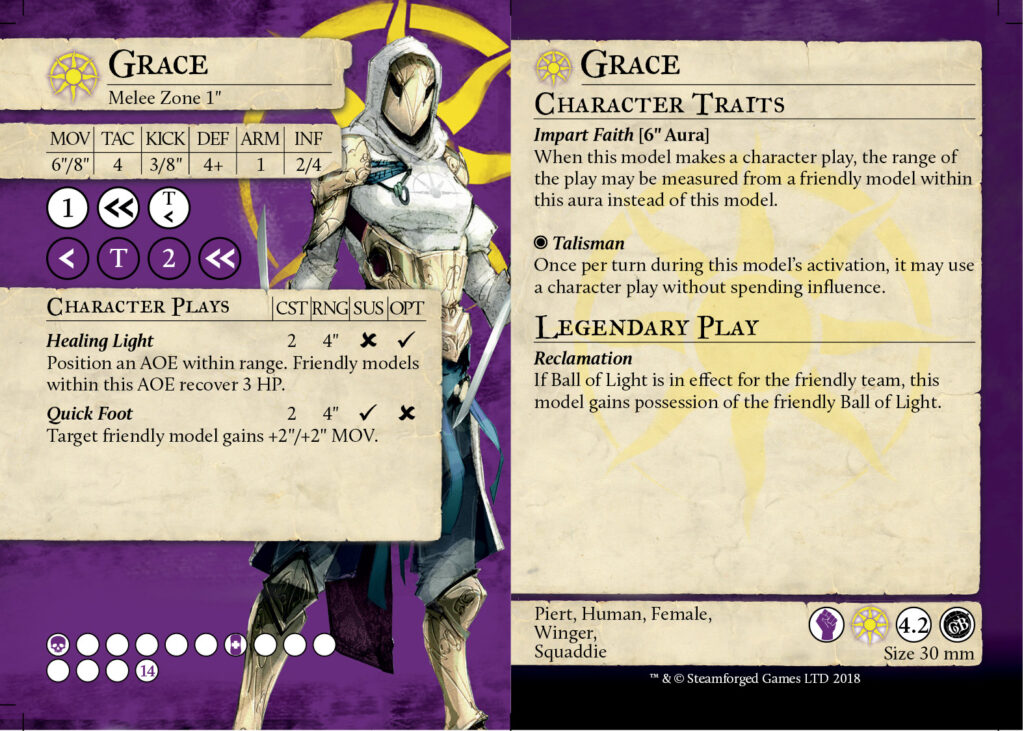
Grace – Crossover Squaddie
Grace is the reason why killing the Ball of Light against Order isn’t a given strategy anymore. Also, she accelerates the models within the Guild even more, so no ball will be safe from the Order’s strikers. Although she is most often used as a influence battery support character, her KICK means that she can be an off-striker whenever it’s needed.
Important thing to note:
- Healing Light and Quick Foot have 4″ range, but Impart Faith basically means it’s actually 11″+ as long as there are models within 6″ of her.
- Benediction’s Rapid Growth together with her Healing Light can make for some hefty durability on paper, but I’ve actually never used it. Grace for me is a Quick Foot bot, that can setup my strikers if need be.
Mist – Crossover Squaddie
The first play-down model from the Union is obviously another striker. While being as ‘that model that scores a goal after getting 8 VP’ in the parent Guild, Mist is very much a staple for the all-out scoring Solthecian Church. Due to the Ball of Light, it’s actually not that hard to set Mist up with some cover to get that nice MOV bonus, and him being the only 2″ striker within the Guild has some perks against i.e. 1″ Unpredictable Movement models.
Important thing to note:
- Mist is the only striker in the team without a way of getting the ball passed back to him. Be sure to use Fangtooth’s Potbellied Pass if you’re trying to increase his striking range.
- While Mist can obviously score goals like a mad-man, he usually is the one to retrieve balls for me. Brisket and Spigot have such range extension that they can stay safe with the ball, while still being in striking range, while Mist has a pretty linear path to goal. I only ever use him if I need his 2″ melee range.

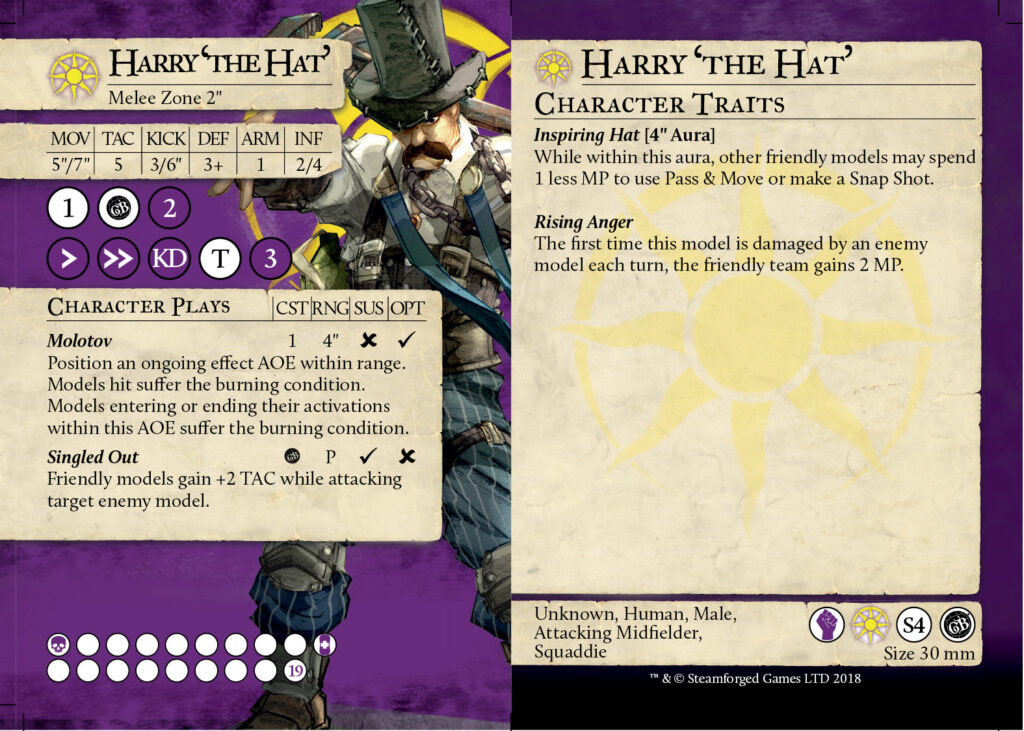
Harry ‘the Hat’ – Crossover Squaddie
The last model of the “Big Three”, and easily coined as “the reason why this Guild works”. Without the Inspiring Hat aura, the Guild would not be as successful as it can be at this time. Besides Spigot, Harry is one of the squaddies that is always chosen for the squad 6. His ability to set up goals runs, ringouts ánd take-outs is second to none within the Guild. The resource efficiency model.
Important thing to note:
- While the Inspiring Hat aura gives useful perks, you still need those passes to arrive. Be sure to try and always go for tap-in passes, even if that means that you’re limiting your striking distance. Missing a pass is way worse for Order than not reaching someone/something.
- While Harry is a nice vanguard model due to hit pushes, Singled Out and Rising Anger, he still only is a 3+/1 without Tough Hide. He will fall quite easily against the stronger beater Guilds, so be careful when you engage with him.
The Game Plan
Kick or Receive?
Due to the goal scoring nature of the Order, and the ability to score on first activation after the opponent’s kick-off, the Order desperately wants to receive. It basically means that they only need to score two goals to win, as the first one is almost guaranteed. Sure, dice can be a thing, but you should never think of it in that way.
When you receive, try to score with Spigot, as Brisket has the tools to try and save Spigot from retaliation ánd score a second goal within the first turn, if the opponent isn’t careful. If your opponent is careful, you can still use Brisket’s I’m Open and the Ball of Light to get i.e. Harry/Benediction/Fangtooth in position to threaten the opponent’s kicking model.
If you have to kick, use Spigot as your kicking model and make sure that he stays within the Inspiring Hat aura and gets the Ball of Light after the kick-off. This way, he can threaten the ball from 13″ away, and he has tools to go around Close Control (Ball’s Gone) or counter-tackles (Close Control). If you fear a counter-knockdown, Benediction can always hand him Sturdy, and Pride can give him Anatomical Precision if the ball is positioned on a model with loads of ARM.
The Ball of Light
Whatever you do, always keep the Ball of Light away from the opposing team. Never give them a possibility to steal it away, because them suffering 4 damage is way less of a burden than your team losing the mobility that the BoL gives. If your opponent has ways of getting rid of the BoL at range, i.e. Puppet Master, Seduction, maybe it’s a good idea to bring Grace.
Because the Order is so dependent on the added mobility that the BoL gives, be sure to always go for tap-in passes when passing with it. Missing a pass and having a bad scatter usually means that a goal run is off the table for the entirety of the turn, which is very bad for a Guild that likes to play aggressive tempo football.
Victory objective?
One of the questions that people ask is “does Order only score goals?”. The answer is very much no. If anything, the BoL can be used to add extra ganging up bonuses for your beaters to go for those momentous 2 or 3 (or 6) results, or maybe even wrap. I’ve seen players go 1-4 or 0-6 with the Guild, although I’d say that these results are unusual at best. I have to say that it is very much dependent on your choice of squaddies, but 3-0 and 2-2 seem the best options for now.
The Tactics
PSA: Every single Order line-up should have Spigot and Harry in them. This means that I will only mention the two filler squaddies during the strategy paragraphs below.
Full Football
Mist, Grace
This squad means that you’re fully set on grabbing that 3-goal victory objective, and it has loads of pressure on the ball. The team should play like a Shark-team – try to score at least once in turn 1, and get all four models with decent ball-threat as forward as possible by using the Ball of Light effectively.
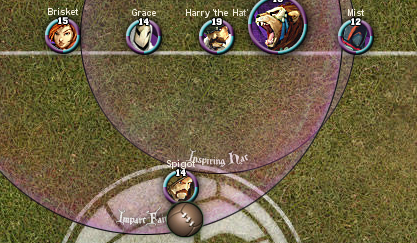
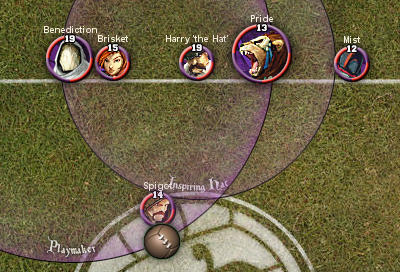
On receive, your setup will look something like the figure below:

As Spigot and Brisket can go very far in terms of retrieving the ball from the kick-off and scoring immediately, Grace is positioned in such a way that she can still throw Quick Foot on the entire team through Impart Faith and being within 6″ of Harry, who is within 4″ of the rest of the squad. Grace can now retrieve the ball for Mist, who can then be dodged up and go for a goal on the second activation. Obviously, Mist cán go for a first activation goal if the ball is close enough through the center, but then I’d rather let Spigot handle it. Harry is positioned directly opposite the opponent’s kicking model to allow for the biggest spread of ball retrieval possibilities, while also keeping the Inspiring Hat aura alive for any of your striking models. Spigot is placed in between Harry and Brisket to lower the chance of Brisket having to go for the first goal. You’d rather have her or Mist go for the second goal.
The influence spread will be somewhere around Brisket 5-6 – Grace 0-1 – Spigot 3-4 and Mist 3-4. Pride and Harry don’t need anything on turn 1, unless you feel you need to use Predatory Gaze versus other goal scoring teams, or Feral Instincts against high ARM targets.
When you need to kick, your setup will look something like this:
Spigot will be your kicker, as he has the best chance of stealing the ball from the opponent’s models and keep it in his possession on a counter. Place Harry and Grace directly besides him, so that if Spigot moves his full 5″ forward, he’ll still be within the Inspiring Hat aura ánd tap-in pass distance. Because the Ball of Light has to be placed on a model on the deployment line, Grace will receive the Ball of Light after the kick-off to make it possible for Spigot to go for a first activation goal run through Reading the Game. Mist and Brisket are both in position to go for a second goal attempt, positioned within the Inspiring Hat aura.
The influence spread is basically the same: Brisket 5-6, Spigot 4, Mist 3-4, nothing for the rest of the squad.
For both kick and receive, the ideal game plan would be for Spigot to go first, generate momentum using a combination of the Ball of Light, Reading the Game and the Inspiring Hat aura, and then sprinting/charging for the ball and scoring with Bonus Time. The Ball of Light is left on either Brisket, Mist or Harry. After the goal, Spigot dodges back towards his team, as close to Brisket as possible. Now you have the option to dodge forward with the Ball of Light, legendary onto Spigot to dodge him to safety, and then Brisket can go for a goal run of her own. If all goes right, you’ll be two goals up in turn 1, and the opponent only has Brisket to go and attack, which will be difficult through Unpredictable Movement. Obviously, if you have time to go for a Quick Time and there’s some nice cover nearby, Mist can also go for this second goal run.
In turn 2, Brisket, Spigot, Mist and Grace should have been positioned in such a way that they’re all threatening the ball from the get go, so the opponent hás to respond to that. This means that if the opponent hasn’t taken out Brisket/Mist yet, they themselves can also be a threat on the ball.
Your plan is to make sure to score three goals within the first two turns of the game, or at the latest at the start of turn 3. If the game goes on for any longer, you’ll have lost your momentum and fighting teams will have most likely caught up, which means that you’ll lose the race to 12 VP.
This game plan can mostly be used against teams that are wanting to race you with quick take-outs, while not having great access to KD’s, or when receiving against teams that also go for the 3-0 game plan and have no strong control elements.
Teams I’d play this into:
– Butchers
– Cooks
– Falconers
– Any team focused on grabbing kills and doesn’t have loads of control abilities / easy KD’s.
The Golden Standard
Mist, Benediction
This squad kind of has the same game plan as the Full Football squad, but the addition of another brawler means that there is a possibility of take-outs on squishy targets. Also, Benediction brings some influence efficiency and has some nice tech against KD-heavy squads. Try to again score at least once during the first turn, and make sure that most/all strikers are in position to threaten the ball first activation of turn 2.
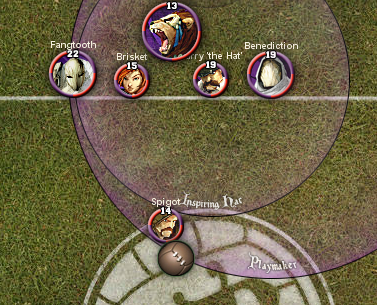
On receive, your setup will look something like the figure below:
Again, Brisket and Mist are put on the sides, and Spigot is put near the middle. Without Grace, Mist now has a weaker goal run, but the team now has more utility or influence efficiency through Benediction. The team will start off the game a bit slower if your opponent kick the ball towards Mist, but at least Mist can drop off the ball to Benediction as a secure ball holder for a while. Reading the Game and I’m Open means that he can keep the ball, until either of the strikers wants to go for their goal run. Pride’s positioning behind Harry means that he’s within 4″ of all models and can give them Anatomical Precision if needed. Once again, you’d rather want Spigot to go first over Brisket.
The influence spread looks something like: Brisket 5-6, Spigot 3-4, Mist 2-4, Benediction 0-1, Pride 0-1, Harry 0. The Ball of Light will be placed on the model with the best chance of grabbing it and scoring a goal immediately – often times this is Spigot.
When you kick, it’ll look something like this:
The difference with the Full Football kick-off is that Brisket takes Grace’s place as the Ball of Light holder. Benediction stays close to her and Spigot for protection, utility and Sturdy. You’re going to want to try and score a.s.a.p. with Spigot, and Brisket or Mist will be your second one in.
The influence allocation will be something along the lines of: Brisket 5-6, Spigot 4, Mist 3-4, Benediction 0-1, Pride 0-1, Harry 0.
The game plan is quite the same as the Full Football one – trying to score two goals in the first turn. But with Benediction and Harry as push-bots, they can also set up some take-out possibilities for Spigot or even Brisket. While the Full Football basically only has a three goal victory road, this Golden Standard line-up has the possibility of going 2-2 against the more squishy teams that lack real fighting capacity. Don’t focus on the 2-2, though. It’s still very much a goal-centric game plan.
Teams I’d play this into
– Brewers
– Engineers (with loads of ranged plays)
– Farmers
– Hunters
– Scalpel/Mourn Morticians
– Shepherds
– Union
– Any team focused on 2-2 or kills that has fair amounts of control and decent KD pressure.
The Big Three
Benediction, Fangtooth
When the opposing team has loads of ways of controlling your goal-centered game plan, it’s better to add in some more take out potential. This squad usually tries to get a goal ánd take out setup on the first turn. Besides bringing an actual beater playbook, Fangtooth also brings some threat extension in Potbellied Pass and some extra condition tech with Flagellant.
On receive, the deployment will look something along the lines of:
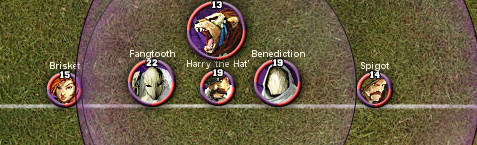
Both strikers are positioned within the Inspiring Hat aura, Playmaker aura and 4″ of Pride for Anatomical Precision. Fangtooth is placed near Brisket as Spigot can spend 1 MP for Reading the Game, while Brisket has to spend an expensive 2 INF for I’m Open, greatly hampering her ability to get an actual goal run if the ball is on an opponent’s model.
The idea here is to hope that the opponent passes to Spigot, Spigot scores, and then Brisket sets up Fangtooth to threaten any of the opponent’s models on this turn. Obviously, if she has the opportunity to score a second goal, this has preference. Use I’m Open and the Ball of Light to get Fangtooth forward enough to threaten a couple of models – preferably within jogging distance (7″).
If the opponent has forced you into retrieving the ball with Brisket, you have two choices: go and score with Brisket and most likely not be able to use her next turn through jailing, or retrieve the ball and pass it back to safety. Fangtooth’s Resilience protects the ball from OPT character plays, and if his Resilience is compromised, the ball can be given to Benediction. One of your last activations will be Spigot using Reading the Game to go and score a goal, or Spigot going after a model that Fangtooth has hopefully KD’d. Your intention is to try and win momentum to go first on turn two, and immediately get a 6 VP activation to start the game off.
The influence allocation is: Brisket 5-6, Spigot 4, Fangtooth 3, Pride 0-1, Benediction 0-1, Harry 0.
When kicking, you’ll deploy your models in a similar fashion as with the Golden Standard:
Spigot kicks, the Ball of Light is placed on Brisket. Here, Spigot again tries to score a.s.a.p. when a possibility shows itself. Afterwards, Brisket will either try to score as well, or set up her big guys with the Ball of Light, Potbellied Pass and I’m Open for next turn.
Influence allocation looks something along the lines of: Brisket 5-6, Spigot 4, Fangtooth 3, Benediction 0-1, Pride 0-1, Harry 0.
While the Full Football and Golden Standard game plans are very much goal-centric, this playstyle likes to scrum a bit more. The 2-2 victory is just as doable as the 3-0 victory with this squad, but they are split between matchups. 3-0 against the bunker-style squad, which need Fangtooth to Ground Pound their bunker to smithereens, and 2-2 against the other 3-0 squads that can’t outfight you.
Teams I’d play this into:
– Blacksmiths
– Engineers (without loads of ranged plays)
– Fishermen
– Masons
– Miners
– Obulus Morticians
– Navigators
– Order
– Any team that likes to bunker up to secure the ball, or 3-0/2-2 squad that has less offensive capability than yourself.
Filler Squaddie combinations that haven’t been used yet
Fangtooth, Grace
I’m guessing this might be able to see play against 3-0 teams that can’t outfight Harry/Fangtooth/Spigot, but I’d say that the free Quick Foot or Healing Light hardly outweighs the scrum strength, ball protection and flat-out utility that Benediction brings to the team. It might be useful against Obulus trying to constantly get rid of the Ball of Light with Puppet Master.
Fangtooth, Mist
Loads of your models will be very influence-greedy, so Fangtooth will most likely have to be used as a battery with Potbellied Pass and Flagellant. I’d say that this actually is a decent shout to play against Alchemists and Ratcatchers, as they’re not that heavy on KD-pressure, Flagellant is nice against high condition teams, and the added 2″ striker will be very useful against i.e. Unpredictable Movement Midas/Smoke/Naja.
Benediction, Grace
In my opinion, this is the meme heal team. If you’re playing closely-knit together, no one should die unless completely focus-fired by the opponent. But this squad doesn’t stick together, unless they’re scrumming. And you need Fangtooth if you’re scrumming… It also brings loads of influence efficiency, so the actual output will be in the hands of super-solo strikers Brisket and Spigot. I have no idea when or why you should go for this playstyle.
Conclusion
If you’re into high-tempo goal scoring teams with loads of janky ball-related plays, the Order might just be the team for you. Just remember that your experience will be very binary – you either don’t miss a single kick and you’re completely breaking your opponent’s back, or you miss a kick and suddenly you’re losing. Bringing a more scrum-heavy team will reduce the chances of you losing off of a single missed pass or shot, but do note that the team isn’t really built for the take-out game. 3-0 or 2-2 will most likely be the results you’re going for.
If you have some questions about anything, just hit me up on the GBCP Discord, and you can also find me at Facebook and Twitter.