
“The Ratcatchers? Tiny Guild, three or four old men lording it over a handful of cities, that’s all, lad. They pay contracts rather than keep their own trappers – but it’s who they’re in bed with that really rankles. Vermin, that’s all they really are. Filthy, disgusting rodents, more akin to their quarry than to men like you or I.“
The Ratcatchers have actually been the first of the Minor Guilds to be released to the game. Skulk was actually part of a community design project – the idea was to create a goalkeeper that was different that any other already in the game (Compound/Tenderiser). Pelage and Skulk were chosen as the play-up models, while Veteran Graves and Bonesaw were chosen as play-downs.
As the daughter Guild to the Morticians, the main theme of the squad was to provide an ample amount of difficult decisions for the opposition. Resource denial, positional manipulation and debuffs are the name of the game, while getting your victory points through a mix of take-outs and goals. The Rats don’t have a specific route to victory – they’re quite adept at any form of VP generation, whether it’s take-outs, ring-outs or goals – but they do need to get their control elements in check, as otherwise the more specialized Guilds will just steamroll over them.

The Team
Piper – Captain
Just alike Obulus, Piper really is the heart of the team. His toolkit is so stacked, that he can basically set up his squad or get victory points on his own – either via a goal or via pushing models from the pitch. Be sure to keep him safe, as your chance of winning a turn can be greatly affected if your opponent chooses to jail him.
Important things to note:
- Haunting Melody can be used for two purposes – pulling people into your lines, or extend Piper’s threat range. Be sure to make the board state such that both choices will end up as a negative for your opponent!
- Swarm’s Obedience can be used to increase goal threat, melee threat, stop enemy goal runs, or to disengage from a losing battle. The possibilities are endless!
- Piper can also Reverie models that don’t have the ball to give them a free sprint.
- Pay the Piper is excellent if you expect the opponent making counters, defensive stances or healing their own models. Use this to make sure you win the momentum race each turn!
- In an ideal world, Piper is able to push his quarry for 14″ – but expect around 6-10″ at most!

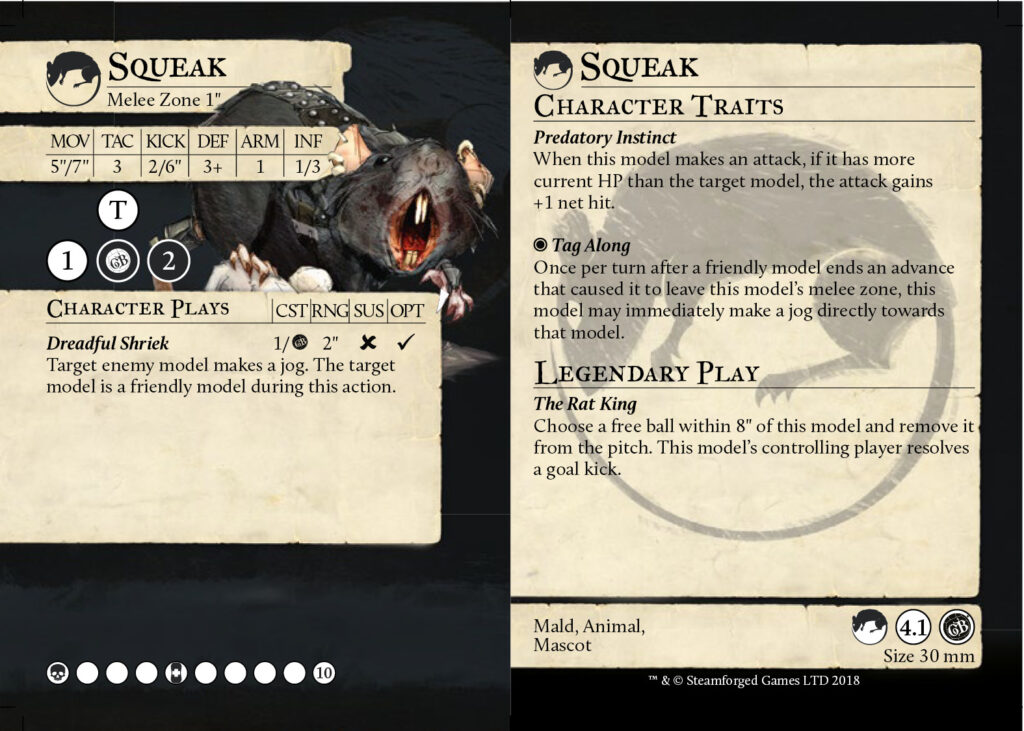
Squeak – Mascot
Most games, Squeak won’t do much but serve as a deterrent for your enemy to kill the ball as a free ball due to the legendary, but remember that the Ratcatchers are quite adept at pushing people off of the pitch. A well placed Dreadful Shriek can be mind-numbingly effective!
Important things to note:
- Dreadful Shriek and Tag Along do not work together. While the target model is a friendly model during the advance, the target is an enemy model at the end of the advance.
- Predatory Instinct makes hitting Dreadful Shriek off of the playbook on low HP models quite easy.
- While the opponent can still decide to kill the ball on a model, they can’t just put it on the ground due to The Rat King.
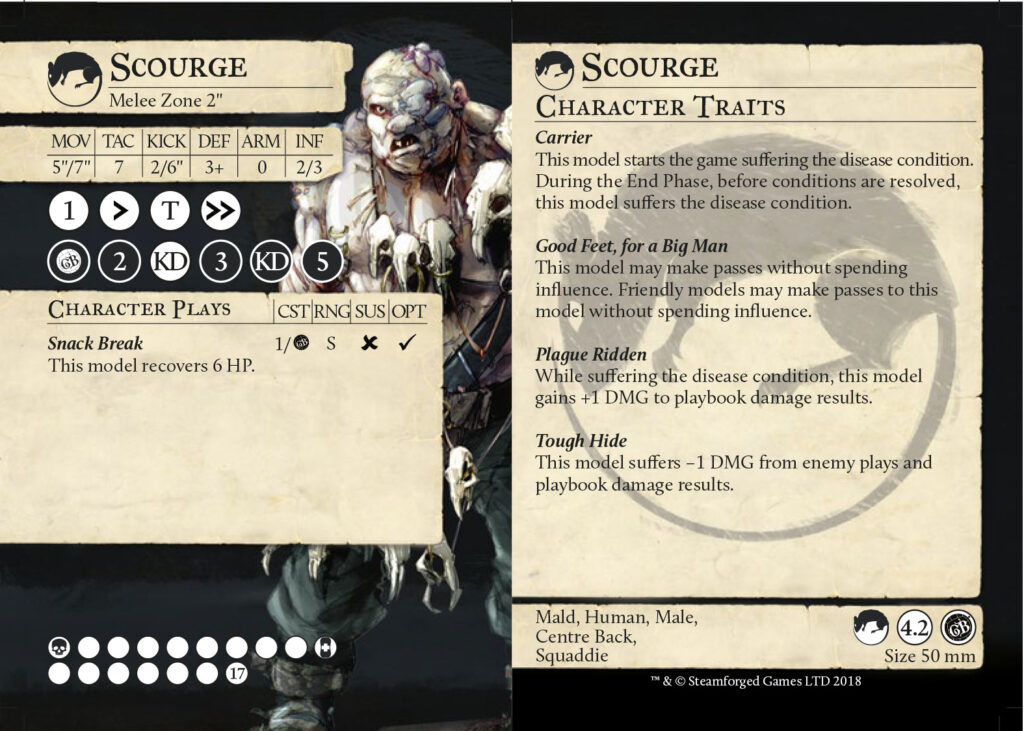
Scourge – Squaddie
Playing Scourge means that you at least are trying to get some regular take-outs on the board, as the big fella is the main beater model of the Guild. Remember that he’s only a 3+/0, which means that under the right circumstances, he can just be used as a momentum generating machine for the opponent. Use him alike Veteran Katalyst (whom funnily enough is Scourge’s idol!) – only go in when it’s safe, and there’s no huge chance of retaliation.
Important things to note:
- Scourge is really unhappy if he’s knocked down. Be sure to keep Miasma near him to clear his KD condition with Salve, while keeping the disease condition on him for Plague Ridden.
- Good Feet means that Scourge can freely increase his or his team’s threat range by 4″. Be sure to use this in tap-in range, as he only has two dice to make a successful kick!
- As the extra MP cost on Rest and Encourage also applies to the Ratcatchers themselves, be sure to use Snack Break to keep this big lug alive during the scrums. It’s the ideal result on a wrap!
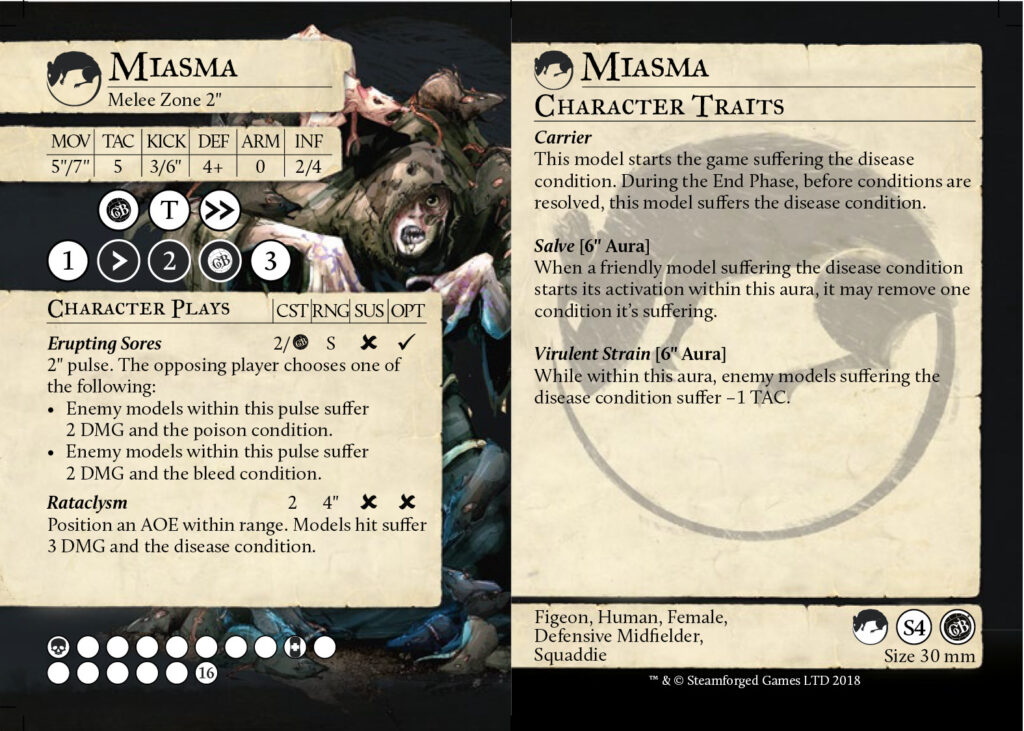
Miasma – Squaddie
Miasma is either the reason you won or you lost the game. Either her debuffs hamper the opponent so much, that your team is able to take over the fight, or you opponent is able to get to her and easily farm some VP from her. While the Morticians are widely regarded as ‘the squishy models’, Miasma takes it to another level. Protect her!
Important things to note:
- At 4+/0 with 16 HP, Miasma is rather fragile – especially as she doesn’t have any other defensive traits. Be sure to keep her safely behind your lines. The key to making the best out of Salve and Virulent Strain is being able to position her perfectly each turn.
- While Erupting Sores sounds amazing to go for, never attempt to use it unless the enemy comes to you, or you can get a take-out with it. Miasma is too fragile to get on the frontline to activate this play.
- If Miasma gets influence, it’s either to throw a Rataclysm, or to sneakily get a goal with her quite decent 3/6″ KICK. Usually, she doesn’t get anything, and works as a battery for the actual VP generators.
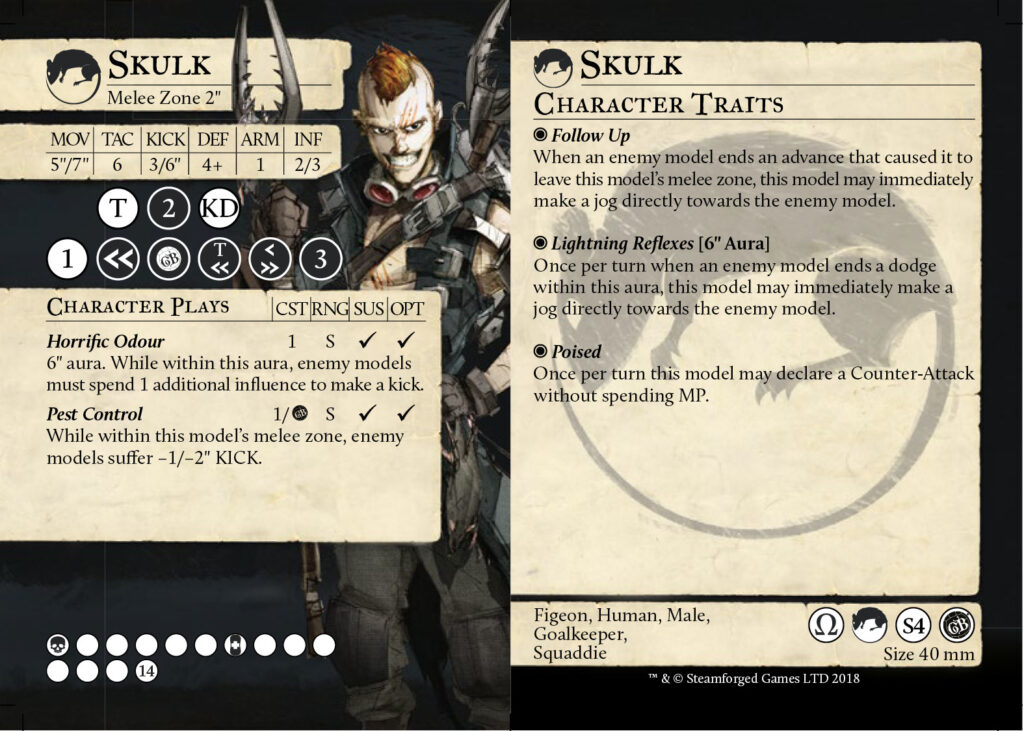
Skulk – Crossover Squaddie
Usually a tech piece against goal-centric opponents, and a non-linear one at that. Just throw him towards your opponent’s scoring pieces and watch them squirm as they just can’t get away from him!
Important thing to note:
- Skulk doesn’t need to stay close to the goal. His efficiency is actually increased when he is basically in the striker’s face due to Poised, Follow Up and Lightning Reflexes. He can keep effects like Horrific Odour and Pest Control active on them at all times, greatly hampering their ability to do anything useful with the ball.
- With his momentous double dodge on 2, Skulk is a deceptively good scoring model.
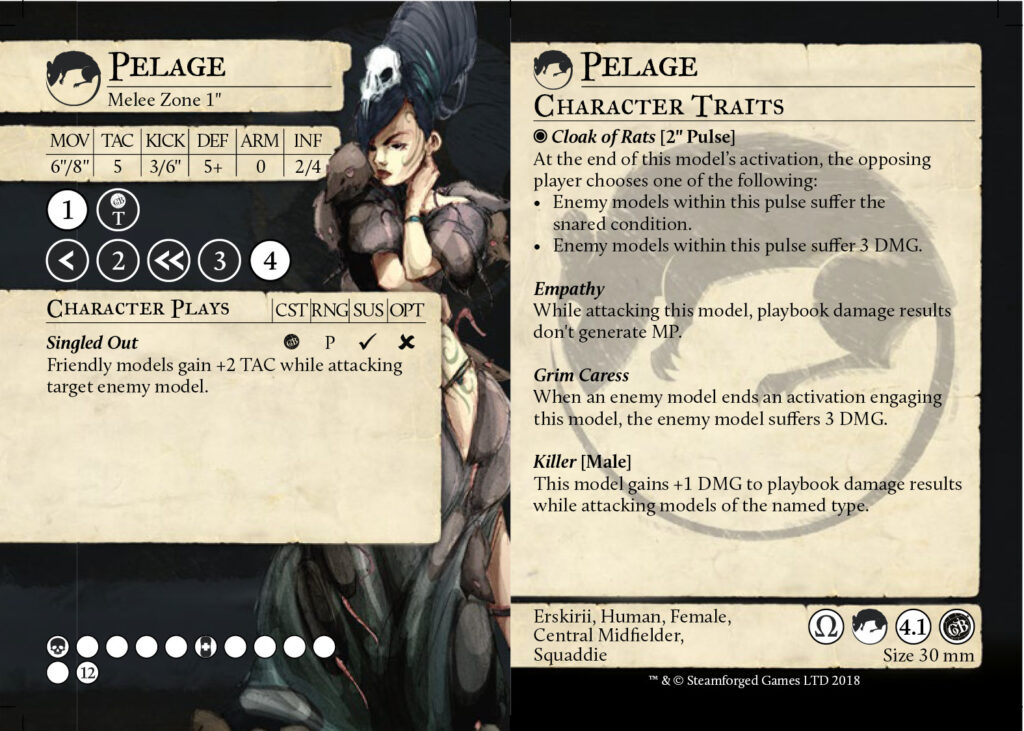
Pelage – Crossover Squaddie
Either your most important battery, or the model that casually one-rounds enemy Male models. She has a nice 14″ goal threat – 18″ together with Pass’n’Move – so she’s also an excellent Reverie target. Because of Empathy, her 5+ DEF and Grim Caress, she’s also very hard to punish for being on the frontline. If you want your opponent to engage onto you, but don’t grab the upper hand in the resource department, Pelage is your vanguard model.
Important thing to note:
- Clarification: the enemy player chooses one of the Cloak of Rats results. That means that if their models are already suffering the snared condition, they can still choose this result to therefore nullify its effect.
- Pelage might just be the one model in Guild Ball that can do the most amount of damage while not getting a single point of influence due to Cloak of Rats and Grim Caress combined.
- Pelage’s damage output is quite decent, especially against Male models, but she’s plagued by having a 1″ melee zone and will therefore struggle to get any output against models with strong counter-attacks.
Bonesaw – Crossover Squaddie
Widely regarded as one of the worst strikers in the game due to his reliance on his double Stamina jog, which can easily be countered by using simple MOV debuffs or even just a KD, Bonesaw is very much a ‘you either hate him or love him’ model. If he can do his thing, he’s amazing. If the opponent can control him, you’ll wish you brought another model. Very much feast or famine.
Important thing to note:
- Bonesaw’s raw striking power lies in having one of the most reliable goal runs in the game due to Meditation. Also, if your opponent doesn’t have an easy to reach T or KD on the playbook, don’t be scared of just running through them with Slippery and Swift Wind. Just let them try to hit that result against 6+. Obviously, it’s 100% hoping that the dice-gods won’t spike the roll positively for them…
- As it’s not always possible to get the ball or go on a goal run, Bonesaw can also be used for other uses – namely ring-outs. Unexpected Arrival and his momentous >< on 2 makes him a worthwhile asset in the ring-out department as a wingman for Piper.
- Clarification: if Bonesaw starts his activation KD’d, the Stamina jog does not remove the KD condition, as it’s an additional jog. The Stamina jog will just be nullified. This is why it’s important to keep Bonesaw on his feet at all times to keep his movement efficiency up.

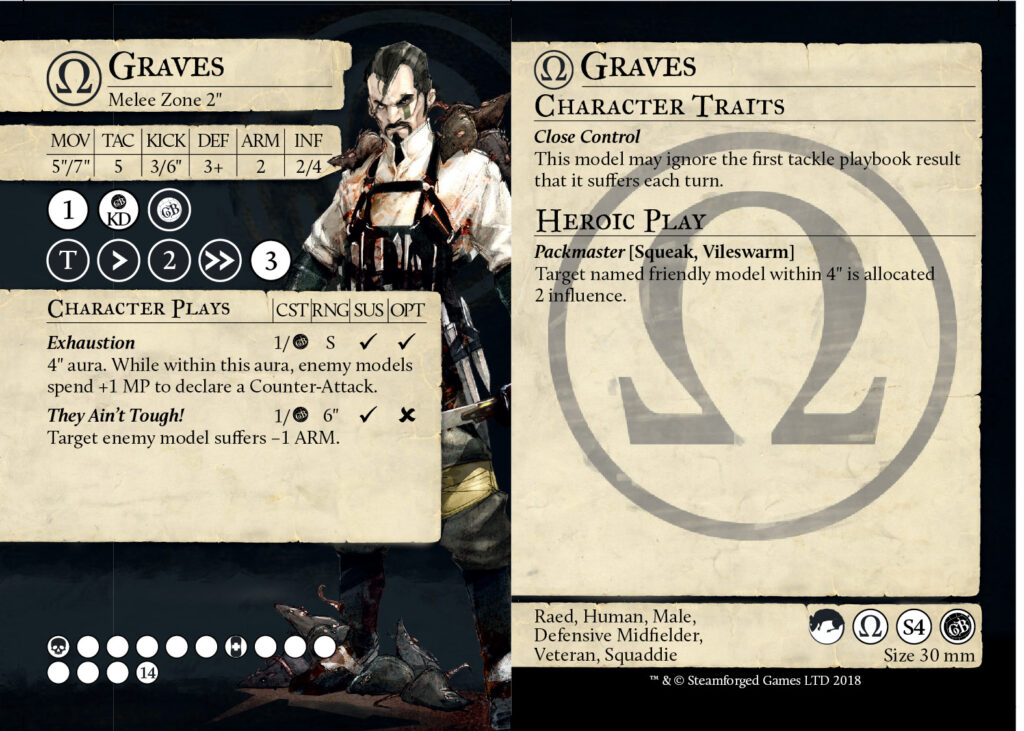
Veteran Graves – Crossover Squaddie
Usually the model that is brought over Skulk to fill the team’s six for a game, as he is just way more flexible in terms of utility and output. His synergy with Squeak also means that you’re essentially playing a 15 influence team, which seems like a nice bonus.
Important thing to note:
- Together with Skulk, vGraves is just a nightmare to deal with for teams that don’t have a way of getting around his Close Control. Just put him in cover with the ball and place Skulk nearby, and your opponent will just pull their own hairs out attempting to pry the ball loose.
- Together with Miasma, vGraves will be your main source of debuffing the opponent. While your opponent most likely can deal with him on their own activations, vGraves is quite safe in his activation due to having a decent KD on his playbook, which is put together with an ARM debuff. Having -1 DEF and -1 ARM on a single hit is very strong, and will put people in range for deletion by either Scourge or Pelage.
- To add to the previous statement, Exhaustion also makes it so that your opponent will most likely never declare any Counter-Attacks while vGraves is closeby. Another form of MP-limiting!
The Game Plan
Kick or Receive?
While the team can do both quite decently, the team’s preference lies in kicking. Piper is a very strong kicking model due to his ability to basically zone people out of an 8″ bubble around him. If they do, either Piper can come towards them, steal the ball and get a goal scored, or the model can move towards Piper, who in turn then taxi’s the model towards his own team for a nice take-out opportunity. On the receive, you are looking to try and hamper the opponent’s kicking model as soon as possible. This can quite easily be achieved by, for example, using Big Feet to get Pelage up the pitch and provide Singled Out, some damage, and maybe Snared to said model. Ideally, Pelage is also Diseased at that moment, meaning that the kicking model is as well. If they don’t go with that model right then and there, Scourge will just be able to use Big Feet to also get into the kicker and just take them out. Also, putting the opponent on the spot with Haunting Melody is fun. Most likely, they’ll tell you to come to them, but Piper can stay quite safe while taxi’ing the kicker towards the Ratcatchers.
Diseased
The Diseased condition is part of the Guild Rule for the Ratcatcher’s Guild. The rule states that “When a model suffering the disease condition ends an activation, models within 2″ suffer the disease condition. An additional +1 MP must be spent when a model is suffering the disease condition uses Rest or is targeted by Encourage.” This adds to the main theme of the Guild, which is resource denial. Do remember, though, that Diseased also affects your own models, so be sure to have some sort of way to play around it, i.e. Miasma’s Salve.
Victory objective?
There is no standard victory objective for the Ratcatchers. They can score goals, they can make take-outs or ring-outs. The most important victory condition for the Ratcatchers is that they constantly pressure the opponent in terms of resource or position denial. Pay the Piper, Exhaustion and Diseased are so very important to get off each and every turn, as well as Horrific Odour against goal scoring teams (or basically teams that like to pass the ball around, like the Order).
The Tactics
PSA:
Scourge, Miasma, Pelage, vGraves
Including Skulk
Including Bonesaw
Conclusion
If you have some questions about anything, just hit me up on the GBCP Discord, and you can also find me at Facebook and Twitter.