On Sunday the 18th of August, fellow pundit Kim Pipers organised a team-tournament in the small village of Rijkhoven, Belgium.
Sadly, on the day itself, one of my teammates had to cancel. When my other teammate and myself arrived in Rijkhoven, there was talk of switching to a singles tournament. After some debate, we found out that there were 6 people without a full squad. My teammate and me were asked if we’d be okay to be separated, and we agreed. I chose to play with Dominik and Matthias from the German squad (obviously).
I brought my trusty Morticians, but decided to do some try-outs for a certain captain. My twelve were: Scalpel, Mourn, Dirge, Bonesaw, Casket, Cosset, Gaffer, Ghast, Graves, Veteran Hemlocke, Pelage and Silence.
If you just want to see the end results from Longshanks, scroll down.
Round 1 – versus Tommy Geuns’ Blacksmiths
Lost initiative roll – Morticians kicking into Blacksmiths
Scalpel – Dirge vs Anvil – Sledge
Drafting phase: Farris – Graves – Bolt – Hemlocke – Culverin – Gaffer – Cutlass – Bonesaw
I decided to go heavy on goal pressure when I realized that my opponent didn’t bring Iron. Culverin and Cutlass would stem my early aggression somewhat with their character plays, but it wasn’t something I figured I would have any problems with due to having access to Hemlocke’s legendary play. I kicked with Bonesaw, who tried to kick the ball near to the central line. The positioning from left to right after kick-off was:
- Cutlass – Culverin – Sledge – Anvil – Farris – Bolt
- Graves – Gaffer – Bonesaw (~4″ in front of Gaffer, started left of Graves) – Scalpel – Hemlocke – Dirge
Turn 1
- Farris collects the ball and passes to Bolt, blocking Bonesaw from going for the ball.
- Tooled Up is placed on Scalpel by Graves, who jogs up to a piece of cover near my own deployment line.
- Bolt passes the ball to Anvil, retrieves back with I’m Open, and passes again to Anvil for three momentum. Jogs himself besides Farris, in Sentinel.
- Gaffer places The Knowledge on Bonesaw. Stays behind cover near my deployment line.
- Anvil passes the ball to Sledge. Uses While the Iron is Hot to dodge up himself, Culverin, Farris, Bolt and Sledge. Sledge is now behind a bunker of Anvil/Farris/Bolt, still outside of anything Bonesaw can do.
- Dirge flies upfield.
- Culverin jogs upfield, placed within cover.
- Because Sledge has parked himself behind a wall of models, I feel safe enough to bring Scalpel up with Hemlocke‘s legendary, The Power of Voodoo. She is placed so that Dirge would follow her using Tag Along.
- Cutlass uses Broadside to slow down Bonesaw and Scalpel, and puts the latter to the ground with Chain Shot. Jogs up to behind a piece of cover, still close to her goal.
- I activate Scalpel and remove conditions with Rest, using my kicking momentum. I declare a charge into Farris, dragging Dirge along with me, getting the momentous Spirit Bomb. It pushes away Anvil and Bolt, pushes Farris into base-to-base, and brings Sledge to almost 1″. Farris‘ counter-attack is unable to disengage Scalpel. I attack Farris again, pulling Sledge into base-to-base with Voodoo Strings. I attack Sledge, pushing out Farris afterwards. Sledge does not counter. I attack Sledge again, pushing Dirge into melee with him. After my last attack, Sledge has 2 lives left. Scalpel pushes herself out of melee and disengages further with Second Wind through her Unnatural Stamina heroic play, placing herself behind Dirge so Sledge can’t charge.
- Sledge uses Tutelage to buy a Piledriver attack into Dirge, resulting in 6 damage. Sledge then jogs up to Scalpel, but stays at 2″. He hard-buys Piledriver, and I start facepalming and say ‘no…’ as he declares an attack on her, and he immediately understands his error. He redirects his attack towards Dirge and knocks it down. Immediately he figures out another problem – Bonesaw hasn’t activated yet, and is now close to the ball. #EpicFacepalmMoment. He heals Sledge with Rest.
- Bonesaw Stamina jogs and then charges through Scalpel and Sledge to end up behind him, staying outside of other melee ranges. He declares the counter, but I get the T< result to tackle the ball and disengage. I activate Meditation and shoot the ball towards the Blacksmith goal with Bonus Time. Anvil is intervening, but 3 dice with re-rolls is too strong. 4-0. The ball is kicked out, but scatters HORRIBLY for my opponent, right onto Sledge, who is in between Scalpel and Bonesaw, and I have a decent momentum lead.
Turn 2
- My opponent plays Seize the Initiative. I place Graves within 4″ of Scalpel, my opponent dodges Sledge (and the ball) backwards towards his own squad, staying outside of Bonesaw and getting inside of Anvil‘s Sentinel aura. I play the Singled Out card – these tokens are placed on Sledge and Bonesaw.
- I activate Scalpel and jog up to Sledge. After my first attack, I push Anvil away with Voodoo Strings, removing Sledge‘s Sentinel buff. Sledge‘s counter-attack is unable to disengage himself. I choose to tackle the ball on my second attack, momentously dodge myself on my third attack, and take Sledge out on my fifth attack, pushing Scalpel within 6″ of his goal. I buy Second Wind via my heroic play and Bonus Time the shot on goal, that hits for a nice 6 VP activation. 10-0. I Run The Length for an 8″ dodge backwards towards my support squad. The goal kick scatters behind the wall of models that are Culverin, Cutlass and Anvil.
- Culverin declares a charge on a my Singled Out Bonesaw, which I defensive stance to 6+. He gets no hits, ending his activation.
- Bonesaw Stamina jogs around Culverin, and disengages with a momentous ><. He then sprint to pick up the free ball behind Cutlass and Anvil, buys Meditation and declares the shot on goal. Anvil is intervening, and Cutlass dodges to within melee range, causing me to suffer -2 KICK. I Bonus Time up to 2 dice with re-rolls and score, ending the match at 14-0.
I feel that my opponent made some less than favourable decisions during his drafting phase, but mostly had a stroke of bad luck at some very impactful moments. Forgetting Sledge’s melee range a week after the change is possible, and not finding a single 6 on an 11-dice charge can happen as dice are dice, but that range 6 direction 6 scatter after my first goal, putting the ball right in between my pay-off models and onto my kill target, was considerably back-breaking. My opponent went on to win his following two matches.
Round 2 – versus Frederik Dhaemer’s Fishermen
Lost initiative roll – Fishermen kicking into Morticians
Scalpel – Dirge vs Shark – Tentacles
Drafting phase: Fathom – Graves – Knuckles – Silence – Sakana – Ghast – Veteran Siren – Bonesaw
Figuring that his only real fighting model was Knuckles, I decided to pick models to hide-away the ball. Ghast can be a pain due to Fear and excellent counter-attacks, and having two 5+ models in Silence and Bonesaw can screw with some rolls, especially when they are in cover. My game plan was to expect the first goal by Shark, get a kill in return, kill the ball until I was at 8 VP, and then score. Fathom kicked the ball towards the left side of my team, quite close to Dirge. The positioning from left to right after kick-off was:
- Fathom (around 4″ beyond her deployment line, within cover) – Veteran Siren – Tentacles – Knuckles – Shark – Sakana
- Dirge – Graves – Scalpel – Ghast – Silence – Bonesaw
Turn 1
- Dirge collects the ball, flies back behind my team, and tries to kick the ball towards Silence (who is out of range for Fathom’s shenanigans). I miss the pass and let the ball scatter right besides Bonesaw, outside of Veteran Siren‘s Fair Wind. It is a free ball.
- Sakana walks up the right flank.
- Graves places Tooled Up on Scalpel, and places himself within cover near my deployment line.
- Tentacles moves up.
- Ghast moves up, dragging along Dirge behind him, keeping around 1.5″ between himself and Graves. Scalpel is is now nicely protected in a fort of 2″ melee zones.
- Shark jogs forward and pulls Veteran Siren forward with Tidal Surge to threaten the free ball.
- Silence places a Fire Blast to block Veteran Siren‘s route towards the ball, jogs around Bonesaw and tries a point-blank pass to him. Miss. Luckily, Bonesaw has a huge base, so just intercepts.
- Veteran Siren has enough range to attempt to Dread Gaze Bonesaw, but misses. (The dice-rolls have been really awful up to now…)
- Bonesaw Stamina jogs himself towards Scalpel, succesfully passes, and sprints into cover, left of Scalpel.
- Knuckles moves up to stand besides Tentacles, positioning to protect Veteran Siren and Shark from any offensive action.
- Scalpel passes the ball towards Bonesaw, and is able to Pass’n’Move. She is then able to jog into Fathom and buy 5 attacks into her. The first attack pushes Scalpel into Fathom‘s cover, resulting in her only having 3 dice for her counter-attack. She is unable to disengage. My second attack pulls Fathom out of cover, the rest of my attacks push Tentacles, Knuckles and Veteran Siren backwards. My last attack takes Fathom out and I use Unnatural Stamina to Second Wind into Graves‘ cover, hereby ending the turn. 2-0.
Turn 2
- My opponent brings on Fathom on the left flank, near a patch of fast ground. He places her outside of 10″ of Scalpel, but forgets to see that Scalpel can get within the fast ground with her 9″ sprint. I activate Scalpel first, pushing Fathom off the pitch and using Second Wind to get away from the edge of the pitch. 4-0.
- As I placed 3 influence on Ghast, my opponent is scared of his output. He successfully uses Blind on Ghast with Tentacles, popping Fear.
- In turn, I decide to pop Knuckles‘ Resilience with Silence, and place a Fire Blast in front of Shark, casually also hitting Knuckles for some damage.
- After her Shadow Like dodge, Veteran Siren uses Dread Gaze to knock Ghast on his arse and jogs to safety.
- Graves places Tooled Up on Ghast, who is still able to reach Knuckles or Tentacles.
- Sakana jogs further along the right flank.
- I decide to clear Ghast‘s conditions with Rest and declare the charge onto Knuckles. Sadly, I forget that Ghast is quite sad at TAC 4, and basically only get the momentous KD on the charge, and 1 damage (up to 2) on the following attack.
- Knuckles stands up and Heavy Tackles Ghast, knocking him down.
- Dirge moves in to engage with Knuckles. I’m trying to set up a take-out for turn 3. I forget to stand up Ghast with Encourage.
- Shark now has a nice bouncing platform to be able to get to Bonesaw, who was hiding the ball. But 5+ in cover was too much for Shark, as he misses his tackle three times in a row, now stranded behind my lines.
- I finally decide to bring the ball upfield, as Shark has committed far into my lines. Bonesaw passes the ball to Scalpel, and just jogs away from Shark – the Parting Blow resulting in only 1 hit due to him being so Slippery.
Turn 3
- I win the momentum race again and choose to go first. My opponent AGAIN brings on Fathom on near Scalpel, this time staying away from the edge of the pitch. His reasoning was to keep Scalpel away from his other models, but due to this tactic I’m effectively to kill 10 influence and gain 6 VP over three turns… I jog up to her and start wailing. My plan is to take her out, as getting 1 result sixfold is enough, and then just keep the ball on the ground for Bonesaw to pick up, as Veteran Siren hasn’t enough influence for Fair Wind. I have some luck and get the momentous 2 twice, so after taking Fathom out I have influence left to kick the ball into space, which stays within range of Bonesaw, and Second Wind myself closer to the Knuckles scrum for turn 4. 6-0.
- Veteran Siren acknowledges Bonesaw‘s threat and collects the ball, but puts in back on the ground nearer to him… I was very confused as to his reasoning, but after the match he said his following activation would’ve been Knuckles, picking up the ball and passing it towards Shark for the snap shot.
- I activate Bonesaw, double jog towards the ball, use Meditation and shoot on goal, scoring. 10-0. I dodge Bonesaw into Knuckles. The goal kick sails across the pitch, right onto Silence, who is but mere inches away from the Fisherman captain.
- Shark activates, and now is able to get the ball off of a 5+ model. He scores the goal. 10-4. I kick the ball left, far away from the scrum, away from the right side where Sakana is still waiting to do anything this match.
- I activate Graves and move in to pop Knuckles‘ Resilience. Now Knuckles is engaged by three models and I still have Dirge, Silence and Ghast left.
- Knuckles‘ following activation really shows his strength if he was playing alongside Kraken or Corsair. He shoves away Graves, Bonesaw and Dirge, and sprints away. Disengage kick, even with 2 crowdouts!
- I let Dirge re-engage with Knuckles.
- Tentacles tries only has 1 influence, so can only attempt to cast Blind onto Silence, as Fear hasn’t been popped yet. He hits the 5.
- Ghast clears his conditions, goes into Knuckles, momentously knocking him down, and doing two momentous 3 damage hits.
- Silence can activate immediately after, able to reach Knuckles even after the -2″/-2″ MOV from Blind, and is able to get the momentous 2 off of the playbook. I win momentum.
Turn 4
- I activate Silence, attacking Knuckles, popping his Resilience. In my following attacks, I am able to deal 8 damage and take him out.
I was expecting this match-up to be quite harsh, as my opponent had taken out 2 players from the Belgium 1 squad in his previous tournament. The only difference? He was playing post-nerf Miners then. It was amazing to see the amount of rookie mistakes, which I seriously didn’t expect from someone able to beat the likes of Koen Vliegen and Mattias Vriens only a months before. Shows how strong Miners still are, I guess. If Frederik had used his momentum to heal Knuckles in turns 2 and 3, Silence wouldn’t have been able to take him out on turn 4, and he might’ve scored another goal with Shark. It would’ve at least been a lot closer, and I’m not sure if this would’ve been the same result against a more experienced player. My opponent won his other two matches.
Round 3 – versus Koen Vliegen’s Union
Context: I had been talking with my German team-mates, and they really wanted me to play Mourn. See her in action. I agreed, but said that they’d have to win their matches then…
Lost initiative – Morticians kicking into Union
Mourn – Dirge vs Veteran Rage – Strongbox
Drafting Phase: Benediction – Ghast – Grace – Graves – Minx – Pelage – Gutter – Gaffer
I immediately realized I wasn’t going to win this fight. Not if Koen would decide to play the stand-off, which is the correct call for this particular match-up. I also drafted my receiving line-up, which was an incredible rookie mistake – I had no threat extension, no ranged plays, nothing… I’m not going to do a play-by-play record of this match, as it basically resulted exactly in what you’d expect.
Koen held the ball, could stay away further than I could as he had threat extenders for Rage, while I only had access to Mourn’s Quick Time, and was constantly just throwing axes with Minx, waiting for me to commit. After turns 1 and 2 resulting into nothing, only him passing the ball around for momentum and throwing an axe for damage onto one of my models, I had enough and hard-committed Ghast to the fight. I knew that it would lose me the game, as I didn’t have enough power to break through his lines, but I wanted to go down swinging at least. In the end, I lost Dirge twice, Ghast twice, Pelage and Mourn, but I had my little moral victory by also taking out Rage. We called it 2-12 after the Germans mentioned that they had won, winning our team the tournament. Koen won all of his matches.
I’ve learned a couple of things though. I should’ve played Cosset or Silence here. Lure could’ve been able to give me a target, and Silence could’ve screwed with his activation order or at least chucked some Fire Blasts his way. Maybe even Hemlocke, able to clear Minx’ Snared and provide me with a decent one-time threat extender. One thing is clear – never pick a bunker composition when kicking into another bunker. Obvious, I know, but somehow I still made that error. Still wondering what would’ve happened if I’d just put down Scalpel here… Maybe next time. I’m going to bring Obulus from now on, though!
CONCLUSION
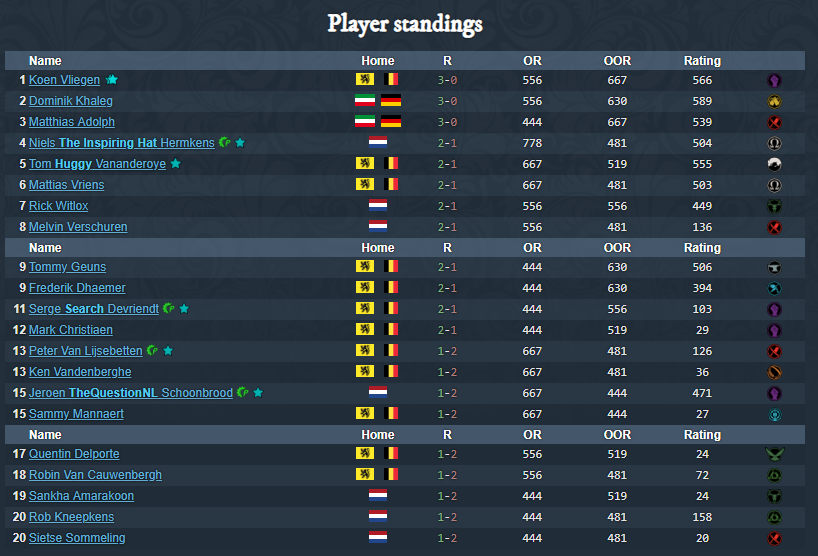
Thanks to my fellow team-mates Dominik Khaleg and Matthias Adolph winning their games against Tom Vananderoye and Mattias Vriens, we won the tournament!

I was so happy that my sudden lapse in judgment in round 3 didn’t cost us the whole thing. I placed fourth overall, having an exceptionally high OR.
We won an amazing trophy. Thanks to Kim Pipers for organizing the day, and I’m psyched to see what’s going to happen at the WTC next month!

Thanks for reading my tournament report. See you next time!